Monday, 24 March 2014

雲白肉 - Yun bai rou - Chinese pork belly slices & パタン - Patan - Dipping garlic noodles

Today 2 dish in one go: Yun bai rou and Patan. Both of them are kind of junk food, awfully indulge you but I cannot label it with "healthy food" ever.
Patan is like an oriental peperoncino, served as a Tsuke men (dipping ramen).  This was a dish introduced in a Japanese drama call "Kodoku no Gurume (lonely gourmet)". The story's about a mid-age business man; one every story, he goes to different restaurant on his lunch break, alone. A very unique drama, the story is just about the food: all through the show, he comments about how the taste of his meals quietly in his mind, along with the long shot of each food and how he eats.
My family sent that to me but the drama is a killer; just indulge my appetite but I'm not in Japan, I can't go to the restaurant to try... I just had to make it up.
So this Patan recipe is totally my own creation based on my imagination from the drama, became one of the most demanded meal at my home lately.

To make the Patan, I need some pork soup, that also comes with this very nice boiled pork belly dish call Yun bai rou. Originally a typical Sichuan cousin, which imported and became popular in Japan.
Yun bai rou means "meat that white as a cloud"; it should be sliced thin as a thin cloud, but my family likes it a bit thicker than that. The sauce contains Tian Jiang you I introduced in the last post, it is really a great match to this dish.


Ingredients
for Yun bai rou (picture is a half of all I made, all gone by 3 people here):
500g a Brock of Pork belly - chose the one flat, equally spread the white fat through the layers, not too thick.
2 slice ginger (with skin but cleaned)
5cm leak (green part)
1 garlic crushed
1.8 litter water

Sauce & garnish:
1/2 cucumber (skin it, take off center seed and sliced thin)
2 Tbsp Tian Jiang You
2 Tbsp say sauce
1 Tbsp white vinegar
1 garlic grand or squeezed
some chili oil if you like it even more spicy

for Patan (for 3-4 people)
6 servings of medium egg noodles
(I use Instant one today, can be raw can be frozen, 2 serving per person for this recipe cause it's never enough for my family, you can have 1 or 2 up to you appetite)
5 garlic cloves crushed and chopped
1cm leak, white part - chopped (forgotten in the picture...)
1 Tbsp soy sauce
1 Tbsp sake
1 Tbsp sesame oil
1 Tbsp salt for soup


Method
Prepare Yun bai rou:
1.Put the pork belly block, ginger a crushed garlic and the green part of leak (cut in halves) in a large pot, with about 1.8 litter of water, bring it to boil then turn down the heat to medium and keep simmering the pot.

2. Skim the scums and keep boiling the pork for about 1 hour, until the water reduce to 1/2. Take out the pork (don't drain the soup out!) and leave them aside.
3. Mix all sauce ingredients. The grand garlic makes the sauce spicy so check the taste before adding any chili oil if you prefer.
4. Cut cucumber in slices, pile it at the center of your dish.
5. Once the pork gets enough cool to handle, slice them - as thin as you can is the proper way, my family prefer it about 2 mm thick. I also trim the skin for my hubby and leave them for my son and I - we love the crunchy skins on.
6. Line up the slices of boiled pork belly around the cucumber, serve with the sauce.

*I usually finish this first then keep it in refrigerator until Patan is ready.

Prepare Patan
1. Prepare the soup first. Strain the soup from the pork belly above to a smaller pot, add 1 Tbsp salt then keep boiling to reduce it until 2/3. Leave it aside.
2. Chop the crushed garlic and leak.
3. Boil enough water as your noodle's package states: the each package of medium egg noodles sold in UK are relatively small, we can have 2 servings per person easily. It's totally up to you how much you boil.
4. Boil a large pot of hot water, put those instant noodles and boil for - the length the package states.
5. Drain the noodles to a strainer, now splash the sake and soy sauce on the noodle in the strainer. Mix them easily using a folk or chopsticks.
6. Now the finishing part: you'll do 2 things in once: heat up the soup again while frying the noodles.
In a wok or a large frying pan which can fit all noodles, put all sesame oil, chopped garlic and leak, heat up the oil on pan for just until garlic start to smell then stop the heat.
7. Place all noodles in the pan, just mix with the garlic and oil. If your noodles are dry and difficult to handle, add extra sesame oil about 1 Tbsp.
8. Serve the soup in a small cup, each portion of noodles in a large bowl.

How to eat:
You can eat the noodles as it is, you can dip it into the soup, you can put the soup on the noodles, that's up to you. I love the combination of the noodles dipped in the hot soup and cold pork belly going together.

Sunday, 23 March 2014

甜醤油 - Tian Jiang You - Chinese sweet aromatic soy sauce

This is one of the best useful Chinese base sauce.
It has a great aroma, similar to Chinese 5 spices but even better to me.

In the next post I'll go through a Chinese cousin that is quite popular in Japan - 雲白肉 "Yun bai rou". This sauce is must thing for the recipe.
But not only that, I used this sauce for fried rice, fried chicken, BBQ ribs sauce, boiled broccoli etc usually mix with soy sauce, sake, Shal Hsing rice wine etc.
One spoon of this make any simple stir fry to add some real Chinese flavor.
The quantity makes a lot to use, usually I make this quantity and keep a bottle of the sauce in refrigerator all time; it can store up to 3 months without problem (I believe it can last longer, but it never remained that long in my home).

Ingredients
200 ml soy sauce
100 ml sake
120g sugar
* 2 thumb size orange or clementine peel - dried for few days (or use dried orange when you forgot to eat...)
* a half  thumb size piece of Chinese cinnamon stick (substitute by a regular cinnamon stick but just a long one peel should do)
* 3 pot of star anise,
* 10 - 15 Sichuan pepper corns
* 2 slice of ginger (with skin but cleaned)
3-4 cm leak (white part)

Note: basically same amount of all listed with *


By the way, that's my 200ml coffee cups. I know it is just 200ml 'cause I once checked using real majoring cup. Now I don't need the ugly majoring cup anymore 'cause I know this works.

Method
1. Put all in a pot and put on medium high heat, mix them using spoon and make sure all sugar melt in the sauce.
2. Turn down the heat to low once it start to boil.
3. Continue cooking until the sauce reduce to about 60%, the sauce should be thick as gum syrup.

4. Stop the heat, strain the sauce to a clean container, close the lid and wait until it gets totally cool down.
5. Store the container in a refrigerator; you can keep it up to 3 months without any problem.


Wednesday, 5 March 2014

Sea Bream Sashimi

One of my pressure cooking is to make sashimi from a fresh fish, which not always there and affordable.


My family members are trained to check fish whenever they goes to market. My hubby found a fresh and good price sea beam from ASDA yesterday. Sea beam is the one of the safest fish using for sashimi. According to many authorities, there is minimal chance to contain anisakis or any helminths. Also there are varieties of ways that you can lightly cook them to enjoy the taste, and in the same time, avoiding any contamination depends on the freshness of the fish.
I'm not a professional or sushi master; my sashimi does not look great, and when I do sashimi, I regret I waste a lot on the bones than the one real professionals can do.
So what?
I really wanna eat sashimi!
*This recipe is totally on your own risk to find good fish and do by yourself.

The picture is all I could get from one small Sea Bream

Ingredients
1 Sea Bream (how to check the good fresh fish here)
salt - as much as you need

Sauce
Soy sauce
Wasabi

Tools
Good Japanese knife
Flat cutting board
a lot of kitchen papers

Method
1. Clean the scales and guts; you can ask store to do this, but make sure it is done well at home again. Anyway wash again the fish under running water, make sure there is no scale remained outside, no blood or guts remained inside.
2. Now cutting process. It is really difficult to describe in writing, but I'll try. Basically you'll make the fish into 3 pieces first; 2 meat fillets and one center bone piece (with head and tail together).
Sea beam has very hard bones at the center of each side, so firstly you will make slice from top and bottom of fish.
Few reminders: Japanese knife is for pulling to cut, not pushing. Also you need to avoid cutting a same place many times - that makes fish meat just messy (but still edible).
3. Firstly easy side. Place the fish head down tail top, showing the right side of face up (hope you can imagine this)
Along with top fins, slide in your knife from near to tail. You must feel the bones under down side of blade, which will be your guide. Slide in the knife until near to the center of fish, you must find a line of hard bones there. Along the center born and line of bones under your knife, slide the knife to your side until head of fish, so make a quarter slice of the fish meat still attached by center.


4. Now turn around the fish up-side-down (not flip) then you can see the cavity that made to take off guts. Put the knife tip in the cavity, then find the ending over the bottom fin, start to slide the knife into the meat.
Again you should be able to find the hard bone bead under your knife, slide into center then will find the same center hard line of bones too. Slide the blade along the bones until near to tail, just like other side.
5. Now one side of the fish has a fillet still connecting by the center bone. At the tail side, the center bones are not so strong. Push through your knife - blade facing to head side.

Push in your left hand fingers between bones and fillet, hold the tail with the loop, then cut through the center line of bones along with the both side slides. Some part is really hard, you need to make it happen.

6. Once you could cut the center bone apart, then cut off the fillet under side fins and also at the tail. Wash the fillet wall and put on a dry kitchen paper.

7. Basically do same thing at the other side. Now you should have 2 fillets and center bone part. The bone part is really good to make fish Dashi. Salted well, leave it for 1/2 hour then wash well and put into oven. Making miso soup with that bones are excellent, call Ushio jiru (sea soup).
8. Cleaning the lib bones. The fish lib bones are connecting with center line bones at this stage. you need to slide in your knife under the lib bones, slide down to edge of fillet along with the bone, then cut off the connection to center. Remember, main purpose is to take off the bones, take as many times you need to retry this. Anyway the fish doesn't have much meet around there, but usually that's the really tasty part. If you cannot do well, cut tit off the part and use it for soup.

9. Now skinning. This requires a bit of Technic. Place the fillet skin down on your cutting board. Hold just a skin at the tail side, place the knife just over the skin. Waggling only first few times to make sure you separate the skin and meat; then push down the knife flat over the cutting board and skin, pull the skin from left side by your left hand. More than you think this goes easy.

10. Next step call sakudori -to take sahimi blocks. The center line bone part of Sea beam is not possible to use for sashimi. Make fillet straight so the bones are lined straight, then cut the fillet aside of the center bone line. Turn it around and do the same to take off only the center part, so it become 2 saku (sashimi blocks) and center bone line piece. Discard this part, has too many small bones for even soup.

11. Wash again the fillet under running water and put on a new dry kitchen paper, take off all liquid.
12. Now this step is called shime (cured). Sea bream is the kind of fish has minimal chance of finding anisakis or any helminths in it, yet I recommend to do this for home cooking. This process also makes the fish meat springy and better taste for sashimi. Place them on a clean dish, then cover by enough salt that you can feel the salt layer on the surface of fish. leave the fish for 1/2 - 1 hour (depends on the size of fish). If this process is successful, the fish meet should get lightly harder than before. After next step when you slice, there should not be totally soft part remained. Wash out the salt under a bit of running water then put on a new dry kitchen paper and pat them well.
13. Now the last step, to cut the saku in to sashimi.
*You must have cleaned your cutting board and knife that you used before this step very well.
Place the fillet - tail side on your left, then slice them in about 0.5cm narrow slices. Remember, always only pulling the knife; if you cannot cut it in once then take out the blade from between meat then place the kinfe back again so you can pull the blade and slice it further.

14. Serve them in line and garnish with some veges, eat with wasabi and soy sauce. Nice to have with a cup of white steamed rice. Important, drink Sake with it (by this, surely no bug can survive *if* any could remained).

* If you find them not firm enough by the end of step 10, I strongly recommend giving up the fish for eating by sashimi, but make them cook as below:
*Ceviche*: Follow the step until 13, then marinate them with sliced onion, green bell peppers, lime juice and sugar. After leaving them over night the meat will be totally cooked by lime.
*Tai-cha*: again follow the step until 13 then place them on strainer in a single layer, pour over boiling hot water. turn in over and do the same. place the slices over your steamed rice, then a bit of wasabi and soy source, threaded leak and sesame seeds. pour over tea (sen-cha) or boiling water just to cover half of your rice.


Thursday, 27 February 2014

Japanese and Oriental ingredients - Kombu & Wakame - dried seaweeds

Kombu

商品写真

Kombu is a kind of seaweed. Yes Japanese uses many different kind of seaweeds but Kombu (or also called Kobu) is the most popular part. Generally used for making Dashi (stock).
This is a thick part of large long leaf seaweeds, dried perfectly and commonly sold as few lines a pack.
It is hard when you get from a pack, need to use seasor to cut them in pieces.
Has very gentle umami (tastiness) and most basic ingredients and must have thing for making Japanese soups.
I have to say it is not cheep. But if you buy a pack, it lasts years. Small piece like a your thumb nail can be good enough to cook a large pot of tasty miso soup.

<How to store>
It needs to be kept dry, air tight and kept out from sun light; I usually cut them in small pieces like 1cm square then keep them in a bottle.
It may start to have white dust on the surface of dried leafs - that's usually not a problem.
It last really few years as long as you are keeping air tight, but will reduce the original taste. I would recommend to use them up in 2 years.

<How to use>
For stock: Cut it in to a small piece then place it in a cold water in a pot you want to make soup or stock. For general use e.g. miso soup, leave it for few minutes then start heating up the pot, take the Kombu just before the water start to boil. For long cooking meal like Nabe, leave it in soup. If you really want to have a high standard stock e.g. for osumashi (stock clear soup), leave it for 10-15 minutes then take the piece out before start heating up the water.
For other use: leave the leaf in cold water over 30min until it gets enough soft. Use it for wrapping veges, meats, fish to cook or to marinate.

Wakame

商品写真
This is the another popular kind of dried seaweed. Commonly used as a Sunomono (marinated) salad and for a miso soup. This is a very thin and fluffy part of seaweeds, easy to use. You can eat it with or without cooking.

<How to store>
Same as Kombu.

<How to use>
Place them in a small cup then pour over cold water - the dried wakame gets about 3-5 times more than when it is dried so make sure you pour in enough water to cover when it gets raw. if the things start to grow more than the water, simply add more water. Leave it for about 10 min (or the package you bought instructs). Drain on strainer, squeeze out extra water easily then serve it as a part of salad or for soup.


Nikudango-Nabe - Hot-Pot with Pork Meatballs

Nabe, commonly translated as a hot-pot, literal means just a pot. 
In general it also refers to a pot full of boiled ingredients, the soup could be seasoned, could be just a simple Kombu Dashi (stock) and eat with dipping sauce when it is served. Although there is no rule for what to be in, there are few common ingredients and well known combinations/variations. Very simple to cook (although my explanation is long), you can appreciate the best of each ingredients natural taste, one of the best food during the cold winter.
This time I made pork meatballs as the main and served with 2 different kind of sauces - Ponzu soy sauce and Goma (sesame) sauce.

Ingredients:
(Serving 4 in a large pot)

<Meatballs>
500g minced pork
2 slices ginger minced
5cm leak white part minced
1 Tbsp soy sauce
1 tsp sake
salt & black pepper
1 tsp sesame oil

<Other hot-pot ingredients>
100g Daikon (mooli)
1 Chinese leaf lettuce (based on British supermarket size, about 10cm diameter ones. Asian market usually carries more larger ones)
1 pack of Enoki mushrooms
2 leaks - choose thicker & whiter ones
1 pack of bean sprouts
100g of glass noodles (you can buy and boil 250g pack and use half of it for salad)
1 pack of Tofu
2cm square Kombu (if not available, chicken stock does good work too)
1 Tbsp of sake
1 Tbsp of soy sauce

<Ponzu soy sauce>
1/2 cup of soy sauce
1 lemon juice
1 Tbsp of Mirin (alternatively, put 2 tsp sugar and 2 Tbsp sake in a small bowl, cook it in micro-web for about 5 seconds, until the alcohol are mostly gone out. mix it to make sure the sugar is melted, leave it to cool down)
* Adjust the lemon juice proportion to fits your taste.

<Goma (Sesami) sauce>
6 Tbsp Neri-goma (Japanese sesame paste)
  or
4 Tbsp tahini + 2 Tbsp water, avoid sesame oil on the top and try to get only the sesame paste part as much as you can
2 Tbsp soy sauce
2 Tbsp sugar
2 tsp white vinegar (Japanese rice vinegar or Japanese distilled vinegar. Good quality white wine vinegar works well too)
2 Tbsp white sesame, grind in a food processor for 1/2 min
1/3 cup cold water
a pinch of salt
* Adjust the white vinegar proportion to fits your taste.

<Garnish>
few bunches of spring onions sliced
Optional: some Daikon ground and drained
Optional: 1/2 cup per person of steamed rice (for ending)

<Japanese specific tools>
Do-nabe (Japanese ceramic pot) is the best always, but be honest I also use a large but not too deep iron pot.
If you have a Do-nabe to use, make sure to dry the bottom of the pot when you cook - drops of liquid is the most easy way to crack the pot.
A slotted spoon and a large soup spoon are essential for serving.

Method:
1. Prepare your pot. Make sure your pot is large enough to share the meal. I use one of about 40cm diameter pot.
<if you use Kombu>
    Pour in water to a large pot until about half line and put the piece of Kombu in. Set it aside until the meatballs are ready.
<if you use chicken stock>
    Just place a half pot of chicken stock.

2. Prepare your meatballs. Pour cold water in another medium size pot and start to boil.
3. While you are boiling the water,  place all meatball ingredients into a bowl, mix them by your hand for few minutes.
4. The mass should be start to get stickier by the melting meat fat naturally. If the minced pork has too less fat and cannot make them together, add small amount of potato starch or all purpose flour (up to about 1 Tbsp). Nice to leave this mixture in your refrigerator for over 1 hour, usually not possible for me with my 2 hungry boys behind me.
5. As soon as the water in the medium size pot gets boiled up, reduce the heat to medium low and start making about 2-3 cm diameter balls. Just scoop it by a tablespoon and make a ball between your hands. Put it into the boiling water from the one you made.
6. Once all meatballs are in the pot, then bring the heat up and boil them for 5 minutes, skim out visible scums through the time.
7. Using a slotted spoon, take all meatballs out to a plate (don't drain out the soup) and stop the hob - don't worry that they are not fully cooked here because you will boil them again in a pot.
8. Place a sheet of kitchen paper on a strainer, then place that on the main large pot. Strain the meatball broth carefully into the main large pot until about 80 % full.
9. Put the meatballs, sake and soy sauce in the main large pot.
10. Cut Daikon in about 2 cm thick, skin it then cut them in 4 quarters. Place them in the main large pot, place the cap and cook them for about 10 minutes until it gets soft. Stop the hob and leave the pot aside.
11. Prepare all other ingredients. Cut Tofu in half width then slice it in about 3 cm pieces.
12. Cut the Chinese leaf lettuce in about 3-4 cm size, the large leaf parts as below, smaller ones are into half.
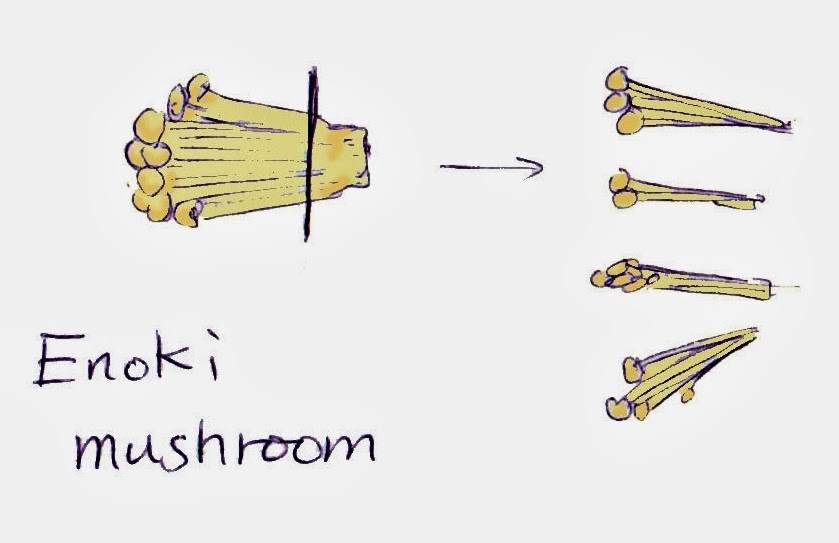
13. Cut the Enoki mushroom, enough above the tighten bottom of a pack, like the picture below, then wash well under running water with separating them into small bunches - especially carefully check and clean the bottom part, they may contain some small piece of soil still in.
14. Trim out the bottom and top green part of the leaks and cut it into about 2 cm slices as below picture.
15. Place the bean sprouts in a strainer, wash them under running water then trim the thin roots and the remained seed shells - be honest, this is boring optional work. When I really don't have patient time I omit this work. Painful task but it makes difference when you eat.
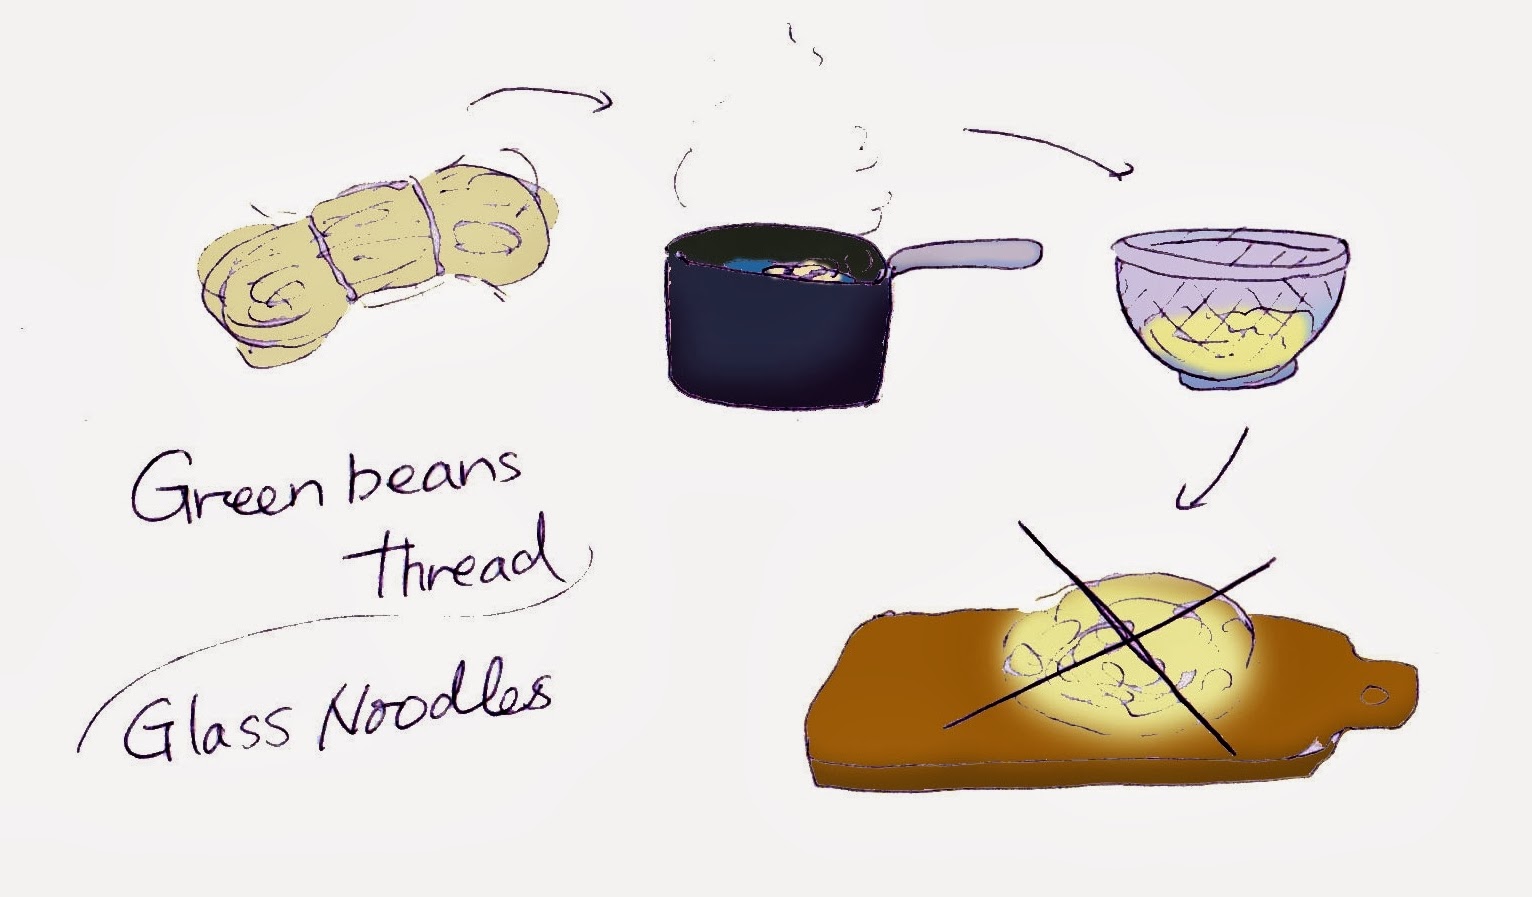
16. Boil the glass noodles with the tied strings in another sauce pan. When the noodles start to get soft, scoop the tied string with a fork (or chopstick if you can use) and take it out from the pan. (The string is difficult to take off when the noodles are dry but much easier after boiling them in a pot.) Waggle them by the fork and make them loose, keep boiling for few minutes until all part of noodles are transparent and soft.
Drain them on a strainer, run over cold water until it gets cool, then place them on a cutting board and cut it in to 4 quarters.


17. Prepare the serving sauce and garnish. Mix all listed ingredients for each sauce in each serving sauce bowl. Slice the spring onion, optionally grind the small piece of skinned Daikon, drained the liquid then put them on each small serving plate.
18. Place all kind of ingredients you prepared into the pot, except the Daikon & meatballs you already cooked in, following the next order: the white part of Chinese leaf lettuce, leaks, Enoki mushrooms, Tofu, glass noodles, and at last, the green leaf part of Chinese leaf lettuce on the top of all (basically the thing that harder and takes longer to cook goes to the bottom and soft/easy to cook things are at the top).
* Don't need to cook all in once, adjust the amounts to put into the pot as your family can eat in once (especially if you don't have a table hob), keep at least few cm without soup at the top of the pot, for not to blow it up.
If you have too much soup then place some out in another bowl or pot. you can add them for the 2nd round.
19. Place the cap on the pot.

Now the real cooking part.
The whole point of hot-pot is to be served from the hot pot to your dish to your mouth while they are on heat. If you have a table hob, this is the time to use it. If you don't, don't worry, you just need to cook them in smaller amount and boil it several times as it goes.

20. Firstly, start cooking it on your regular hob.
If you are using Do-nabe, use medium high heat, keep eye on it and wait until the top of the cap center gets heated. Depends on the size of pot but mine takes about 15 minutes.
Once it is boiled, then move the pot carefully on to the table hob and keep heating the pot with a low heat.
If you are using a regular large pot, then just boil them using high heat until start to steam out, check the white bit of Chinese leaf lettuce are softened then bring it to table.

How to serve/eat:
Take off the cap. The pot should looks like the top picture.
Each individuals are served with a small bowls to take your portion. Serve few each but every kind of ingredients from the pot to each bowl, then each person can pour the preferred type of sauce on it. Optionally add some ground Daikon and/or sliced spring onions. Adjust the sauce strength by adding some soup. If you like soupy way then add up more soup from the pot.
Alternatively, let everyone serve their own bowl by themselves.

In my home, I serve only the first round to everyone, then from the next round, everyone serve their own bowl with what ever they like.
Keep repeating the pot until everyone satisfy the meal. Adjust the soup level by adding some water if it gets too low.

Optional: Ending
Once everyone satisfy with the meal, then the pot should be kind of empty with the soup only remained. To end the meal, we usually put some rice in the remaining soup and enjoy the Ojiya (rice soup). Put the required amount of steamed rice (can be just cooked or cold left over) for about 5 minutes, until rice get soft and soup start to be slightly sloppy, then season it by a bit of salt, miso or soy sauce.
Alternatively, cooking Udon noodle in the soup is very nice way too. again salt, miso or soy sauce to season it. Also if you have too much ingredients still remain in the soup, that makes excellent miso soup for the next day; just heat it up again the pot, then stop the heat once boiled up and mix in some miso to fit your taste.
All this is possible because the nabe has already made the good stock out from all ingredients.

By the way, the Kombu, if you use, should be left in the pot until the end of meal. Not many people like it but I love to nibble it at the end...


Sunday, 23 February 2014

How I flip a crape using a long chopstick


(By the way I made the *ficelle picarde* from cuisinons bien by those crapes.)

Chijimi - Korean Thin Pan Cake

Korean Chijimi became popular in Japan along with all other new Korean cultures. In Japan we have a quite similar dish call, Okonomi-yaki, but with or without cabbage makes a big difference in terms of taste, and the how it baked is very different. The thin made pan cakes contain a lot of veges in it, its springy inside and slightly crunchy outside. The served sauce is completely different as well, the sesame seeds and minced leak flavour in the sauce makes the perfect exotic savoury taste.
It's quick to prepare and good for busy lunch.
This recipe is based on few Japanese/Korean recipes.


Ingredients
150g flour
2 eggs
120 ml water
1 potato grated

a handful julienned carrot
a handful julienned leak
2-3 bunch spring onions sliced

(optional) few seafood sticks threaded

sauce
4 Tbsp soy sauce
2 Tbsp rice vinegar
1.5 Tbsp sesame oil
1 Tbsp leak white part minced
1 Tbsp sesame seeds

Methods
1. Prepare veges. Julienne carrot and leak as below. Slice 2-3 bunches of spring onions. Set aside.

2. Make sauce. Just mix them all in a bowl and leave it aside.

3. Make pan cake mixture.  Crack eggs in a cooking bowl and add flour in few times, roughly mix them all. Add the measured water in few times and now mix them better. Add the grated potato and mix them well. Now the mixture should be smooth enough.

4. Prepare the fry pan on high heat. When the pan get enough heated, add 1/2 Tbsp oil then spread over the surface using a kitchen paper. Just be careful the pan is hot! Now add all veges in the pan cake mixture, then mix them few times until all veges are completely covered by the mixture.
5. Turn down the hob to medium heat then add the mixture on the pan, spread evenly using a fork and make it thin round shape (about 5 mm height). If you like sea food, you can sparkle few threaded seafood sticks on the top. In my fry pan I could make 2 sheets by above quantity. Just make it in your fry pan size.
6. Once the bottom of the pan cake start to get a bit brown then turn the Chijimi. Leave it until the other side also get light brown colour.
7. Serve on a large plate, cut it in slices, dip the sauce and dump it in to your mouth.
Job done :-)