Thursday, 24 April 2014

田楽とうふ - Dengaku tofu - BBQ tofu


Yes, Tofu on BBQ. It's a bit sound strange but one very traditional street food.
A bit crunchy outside, melting soft and burning hot inside, the rich sweet sauce makes the simple ingredient so tasty. Yummy.
Dengaku is the style of BBQ in Japan, and the sauce is called Dengaku-miso, commonly used on boiled or BBQ ingredients. The real sauce requires Hacho-miso, which really difficult to find outside of Japan. Instead I used Hoisin sauce which you'll be able to find at any Chinese glossary stores, but amazingly similar taste.
Unfortunately I had no chance to take photo of the real BBQ ones, it was too difficult to stop people eating them before taking any good shot. So this is a picture from the few left slices, I've repeated using a regular frying pan. Still, it was really good.

Ingredients:
1 pack Tofu (1 pack of Tofu makes 3 servings. Multiply by how much you want to prepare)

for Dengaku-miso sauce (easy amount to mix, for about 2-3 packs of Tofu):
2 Tbsp white miso
2 Tbsp Hoisin sauce
1/2 Tbsp soy sauce
2 Tbsp sugar
1 Tbsp mirin
(or 2.5 Tbsp sugar + 1 Tbsp sake, or 2.5 Tbsp sugar + 1 Tbsp water)
1 Tbsp sesame seeds

Required tools:
6 BBQ skewers
few kitchen papers
* 2 cutting boards - not too smooth ones
* a plate or kitchen towel
(* or instead, a large strainer, a large plate)
Some weight e.g. 2 coke cans

Methods:
1. Drain water from Tofu. This is a very common basic step for using Tofu when you want to use them for many recipes. Take out the Tofu from package, easily rinse under water.
Now prepare the platform to drain them. Place a cutting board just beside of your kitchen sink; one side to be over the edge of sink and elevate the other side few cm higher than the edge of sink using a plate (up-side down) or rolled up kitchen towel, so the cutting board makes a slope down to the sink. Now place Tofu on the cutting board, then place another cutting board over them, then place some weight - about 2 cans of coke.
1. Alternative step: If above step is difficult, instead wrap the Tofu by a kitchen paper, place it on a large strainer, place something flat like a plate larger than the Tofu, then place 2 cans of cokes.
2. Leave it for at least 30 min, ideally 1 hour. Pat any water around Tofu by new dry kitchen paper and place the Tofu on a cutting board.
3. Cut them into 3 long and thin slices.
4. Place one of the slices on cutting board, the largest surface up, then skew from the smallest surface using 2 BBQ skewers (see the picture for reference). It's easier to handle on BBQ if you make the skewers slightly open at the ending like a long V shape.
5. Prepare sauce. Mix all ingredients well in a small cup.
6. Place the skewed Tofu slices on BBQ - be careful not to turn around, leave them on for 10-15 minutes until the surface start to get slightly burned. Turn the side of Tofu time to time (just like any other BBQ things)
* For the top photo ones, I fried them on Teflon frying pan with high heat for about 15 minutes instead.

7. Place the Dengaku miso sauce over them. Some people brush the sauce on the Tofu and burn miso a bit on BBQ, I like it as the Photo with the miso totally soft. Just eat like any other BBQ things!

Alternative ingredients good with this sauce:
1. Aubergine - cut them into 6 slices, just like how you cut apples. Skew from the bottom of slice, where the skin is wrapping in curve, until top. BBQ in a same way as Tofu.
2. Leaks - cut it in to 3-4 cm longs, skew 5-6 of them from a side.  BBQ in a same way as Tofu.

Wednesday, 9 April 2014

手羽餃子 - Chicken wing gyoza


This is one of my most favourite dinner, the taste is guarantee great, even better than the ordinal Gyoza, just takes much care and time.
It looks like just a fried chicken wing, but the inside the bag of skin is full of Gyoza meat filled.

Just dip in the same Gyoza sauce and bite on. Can't forget the taste, can't give up making it even it takes so much effort & time. (It took me 2 hours...)

Ingredients:
about 12 chicken wings (we use only the wing tip part)
a) 200 g minced pork or chicken
a) 1/2 Tbsp ginger minced
a) 1.5 garlic cloves minced (I love a lot of garlic in but this is totally how much you can take)
a) 4 cm leak white part minced
a) 1/2 Tbsp soy sauce
a) 1/2 Tbsp sake
a) 1 tsp sesame oil
a)  salt & black pepper
toothpicks - as many as the chicken wings, plus few for spare


Serving sauce
Soy sauce & sushi-zu (1 : 1)
few drops of chilli oil (La-yu)

Method:
1. Mix all ingredients with a) above, leave it a side.
2. Prepare chicken wings. Firstly clean all wings under running water, take off any visible feather or the root remained.
3. Cut out the wings in to 2 parts. We need only the wing tip and the next section, not the meatiest near the body section (I usually use the remained sections for Karaage). Open the joint between the thickest part and the next one, hold the thicker side by your left hand, slide the knife along with the holding thick part - so keep the most of skin on the other side. If you slide the knife straight down along with the thick part, that should hit the joint cartridge and should be easy to cut into two pieces.


4. Take off bones from the next section. Basically the part becomes a bag for the minced meat. Using a sharp knife, slides down the skin and meat about 1cm from the cut off joint, so the junction of 2 thin bones appear. On the junction at just between those 2 bones, slice down the knife and cut off the junction connecting those 2 bones, so those 2 thin bones become disconnected each other and free to move independently. Push down the meat around the top further, trim a bit using knife if you need.
5. Now stand the section - the cut off joint up. There are 2 bones, a thin bone and an even thinner bone there. Pull and open those bones apart from each other, to about 180 degree, with sliding down the meat around the thinner bone. This shouldn't be too hard. Now twist and screw the thinner bone for 360 degree, then the bone will be totally free to take off.

6. Now thicker bone. The skin is connected to the bone at only one side like a line. All other part are with meat just hanging around that. So using the sharp knife, take off the skin connection along the bone until half of the bone length. Now hold the wing tip by your left hand, hold the bone on your right hand, then snap  the joint to front, back , up and down, then twist the bone for 180 degree - now the bone is totally free from joint and easy to pull off.

* If you think the steps until here are too hard, just make them Karaage, because the most painful part is after this. 

7. Prepare toothpicks and a small spoon handy. Each chicken wing now has a cavity to fill with the minced meat mixture. But those still have chicken meat until near the end of the skin bags. Using the small spoon, push off the meat around the entrance of the skin bag and make clear of meat for enough space to close them later. Then using the same small spoon, push enough meat mixture into the cavity - fill as much as you can but think you have to close at the end; the skin is flexible and not easy to break or explode during cooking.
8. Just like sawing the clothes, saw together the mouth of each bag by the toothpick, about 3 stitches, so the open part of bag is closed and the contents cannot come out. Be really careful for not stubbing your fingers.

9. Now easy part. On a frying pan, put about 1 tbsp vegetable oil. If you are using Teflon frying pan, you don't need any oil. Turn on the heat to medium high, place all wings - thicker skin side down. Fry them until the down side gets brown, and then turn them over.
10. Once the other side also get brown, pour about 1/2 cup water in the pan then cap it, turn down the heat to medium and keep cooking for about 10 min. 
11. Take off the cap and continue cooking until the water is mostly evaporated. Keep in mind the water will get reduce, but oil will come out from wings, so drain the oil out if you don't like them. 
12. Serve them with steamed rice. Take off the toothpicks before you dig in!

Thursday, 3 April 2014

ひき肉となすのカレーライス - Japanese minced meat & aubergine curry


There is a huge difference between Japanese curry and Indian original curry. Japanese curry is much thicker like stew, mild or not spicy at all compare to any other curries, usually chunks of vegetables and meats are in and served with rice on a plate, garnished by some pickles.
This has a really good reason and history behind it.
Curry was introduced to Japan by the UK trading ship about 200 years ago. That curry was a British curry, the earlier adapted style from colonies, which was more like a mixture of stew and curry powder.
Then after that style is imported to Japan, that British version is adapted again; it has been thickened by the flour and served with rice.

The Japanese Curry Rice is one of the most popular meal in Japan, very close to Ramen.
To make Japanese Curry you don't use spices, you use "Curry roux"; it's a block of instant curry sauce.
There are 2-3 big food makers proving the roux and they are dominating JP market, and, they are all more or less same taste; this means, every family in Japan eat mostly same taste curry at home.
We do mix the different company's roux and make "home special" but that doesn't make that much difference, unlike between masala and tkika. Small percentage of families may add some additional things in it, but not the thing you may consider for making curry; soy sauce, dashi, mayonnaise, and most unusual one, chocolate.

At the end, the real variations are created by what is cooked in the curry sauce.
Most basic ingredients are chunk of: carrot, onion, potato and beef or pork stew meat.
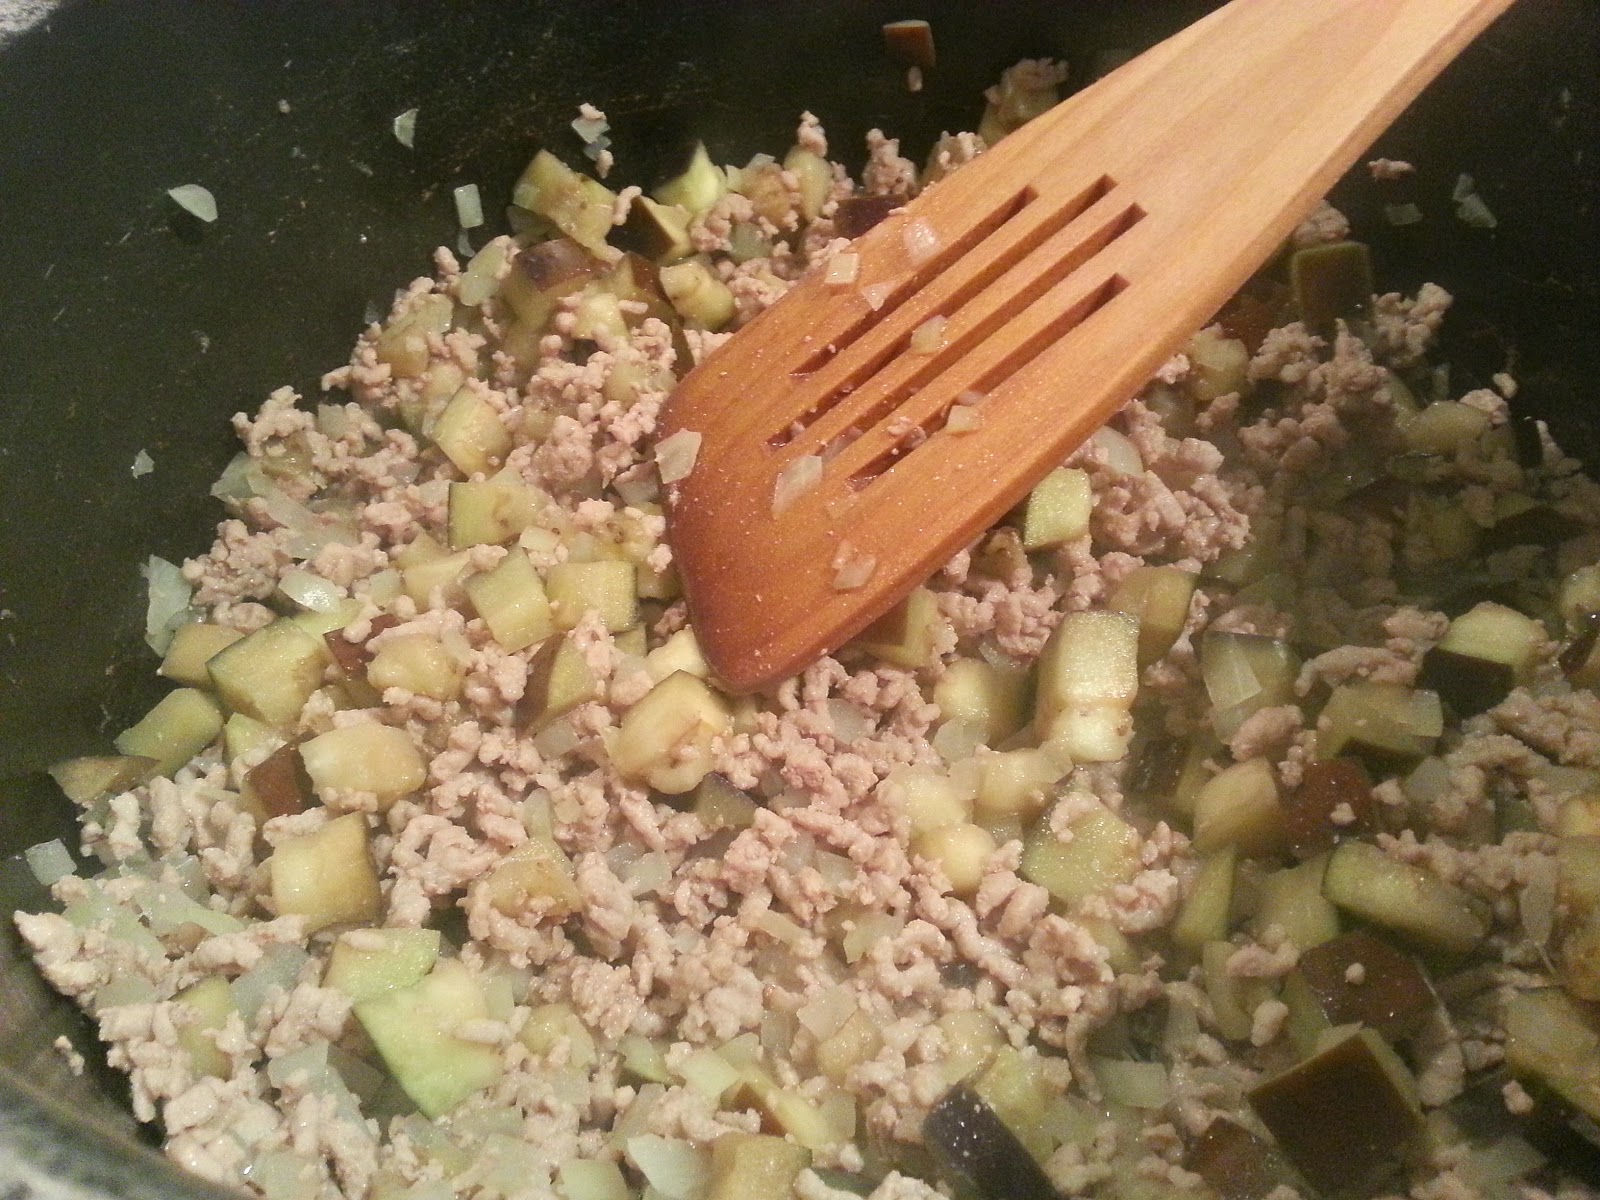
My minced meat & aubergine curry is a kind of unusual variety in Japan, it's much quicker to cook than the regular style one but the taste has nothing to compromise compare to the regular ones.


Ingredients (for 4-6 people):
1 pack Japanese curry roux (better if you can have half pack each of any 2 kinds)
500g minced meat (beef, pork or chicken. No lam. I used pork this time).
1 large aubergine
1 medium onion minced
enough water as the curry roux package states.
3 Tbsp vegetable oil
(optional) 1 tsp sake
(optional) 1 tsp soy sauce


Methods:
1. Dice the aubergine into about 1cm cubes. Put them in a large bowl of cold water, place a plate in the bowl over the floating cubes and push in; so all cubes can sank in the water. Leave it for 10 minutes then drain them by a strainer.
2. Put a large pot on a hob with oil, then turn the hob to medium high heat. Fry the minced onions for 5 minutes until it start to get brown.
3. Put all minced meat, fry them together, separate the minced meat to grains. I like to add sake here because that can reduce meat strong smell, but that's totally optional. Cook until all minced meat change the colour and cooked.
4. Drain the water well and put all diced aubergine in the same pot, fry them together until aubergine cubes get soft, for about 10 min.
5. Pour water in the pot as your box of curry roux says, skim the scum for first few minutes and cook it for another 10 minutes. (Package may say to cook for 1 hour, don't worry, that's the time takes for cooking chunks of veggies and meats, not applicable to today's cooking)
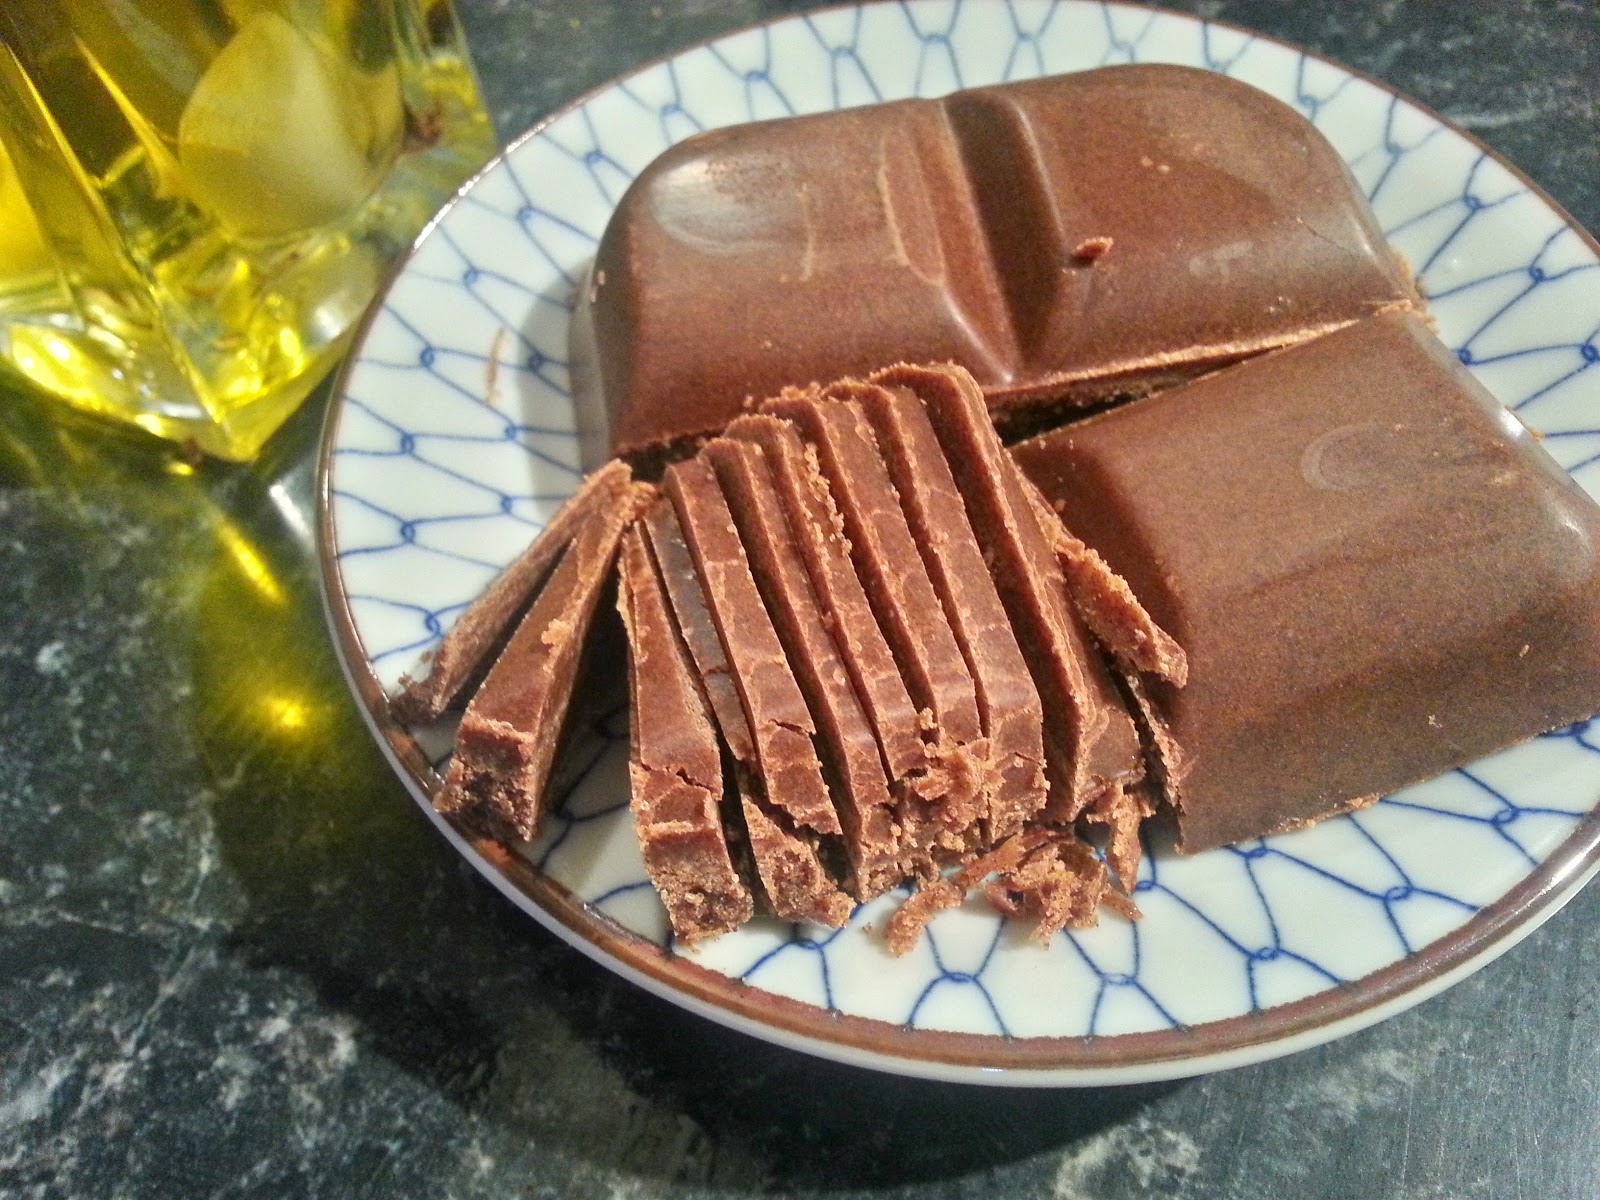
6. Meanwhile, slice the curry roux. Each curry roux box comes with 2 packs of curry bars, each bar is ready to break in to 4 pieces, and most of package says you can just add them as how it is. Truce is, it doesn't melt well always, a remained piece of roux looks totally like a chunk of been in the curry sauce; if you even once hit that in your mouth then you wouldn’t complain for this step. Put the bar on a cutting board and slice them as thin as you can.

7. Add the sliced curry roux in the pot, immediately mix them well in to soup. Cook for another 10- 20 minutes, until the aubergine gets really soft.
8. Curry rice serving style: serve a small mountain of rice on one side, then serve the curry on the other side.


Sunday, 30 March 2014

Spring Savoy Cabbage rolls in tomato sauce


The season of spring savoy cabbage is on, UK supermarkets are competing some extreme sale between them lately. The price is not the only thing getting my attention, but the colour of the cabbages have changed from the winter dark to bright green of spring, shouting out loud from the shelf to me. 
I love this cooking 'cause those rolls provide plenty of different vegetables and nutrition in one go, they are so tasty, pleasure to handle the all beautiful spring season colours, and at the end, it comes pretty economic (roughly about £3 for all?).
My cabbage rolls are to enjoy the cabbage. The layer of cabbages cooked soft and juicy, well absorbed the taste from the soup come out from the bit of beef makes us pure joy! 

Ingredients (for 8-9 rolls enough for 3-4 people):
250g minced beef (I use 12% fat or more, because that's the only fat comes out in this cooking and even you scoop them out during cooking)
1 medium size savoy cabbage
1 onion finely minced
1 small carrot finely minced (either by hand or food processor)
2 bunch of spring onion (green onion in US) sliced thin or minced by food processor
1 pointy bell pepper minced by hand - is much better taste for bell pepper

condiments for meat mixture
* 1/4 tsp grand nutmeg
* 1 tsp smoked paprika powder 
* 1/2 tsp dried thyme
* 1 tsp dried marjoram
* 1/2 tsp grand black pepper
* 1 tsp salt
* 1/2 cup of water from boiling cabbage

for sauce
- 1/2 can of chopped tomato
- 1/2 tsp dried thyme
- 1 tsp dried marjoram
- 1 tsp dried basil
- 1 bay leaf
- tsp sugar
- salt and black pepper to taste
- all remained water from boiling cabbage

(optional: some butter)

Method:
1. Prepare the cabbage. Rinse the cabbage then peel out the last one layer of dark outside leafs that not tightly closed to the cabbage, leave them aside.
2. Prepare a pot that the cabbage can fit easily in. Put the cabbage in the pot, pour in water, just to cover up near the top of the cabbage, then take the cabbage out. Put the pot on a hob and boil the water up.
3. Stub the stalk of cabbage by a cooking folk, that you can use as a handle of the cabbage. Dip the cabbage in the pot of boiling water, leave it for about 30 seconds - the cabbage leaf on outside become soft and easy to peel. Take the whole cabbage out on a large strainer, peel the softened leafs cut the leaf out using a knife at the near to the stalk. Repeat this process to peel off as many leafs as you can, until it get to very core, about 4-5cm radius ball. Keep the leaf in order of peeling - this will help you sorting them later. Cut the core out from the remaining stalk.
4. Once you peel them until the core, now boil the stalkside of each leafs in the boiling water for another 30 seconds. Keep the order of leafs but in other way around now - so the smallest ones goes to the bottom and the largest ones comes at the top of pile.
5. Boil also the core ball and the very outside leafs kept from step1 until it gets enough soft. Cut them in to mince.
6. Sort the leafs into individual roll set: On your cutting board or clean kitchen table, take the leafs from the top of the pile (means from the largest ones), deal them in to 8-9 piles - the number of rolls you want to make - like cards; deal the leafs up to the number, once you hit to the last one (8 or 9), then return back from the last one to 1st one in back order. Next line go up from the first one again, repeat until you deliver all leafs into piles. (This should give almost equal quantity and surface of cabbage for each rolls)
7. For each group of leafs, go through them one by one and trim the hard center vain of leaf (but keep the order of leafs): place the leaf outside up on a cutting board, slice out the center hard vain to nearly the leaf thickness using a sharp knife. Mince the sliced vain remains very thin and set aside with the minced core and outside leafs.
8. Make mixture of meat. Put the minced beef, the minced cabbage leafs from above, all other minced vegetables and all condiments for the meat except the water from boiling cabbage in a bowl. Mix them well using your hand; the mass should be hard and dry at this point, start adding the warm water remained from boiling cabbages little by little (if you forgot keeping it, don't worry but just use some warm water). Keep adding the water with mixing the meat, until the mixture get quite sticky and soft so you can make the mass together easily, up to about 1/2 cup.
9. In a bowl, roughly divide the meat mixture into number of rolls you are going to make. Take the group of leafs one by one, then fill the center smallest leaf with the divided meat mixture. Don't force to fill the all portion, the amount you cannot fit in to the smallest center leaf. You can make small meat balls with remaining and put them together later.

Isn't it so beautiful, just like blossoming a bunch of spring flowers?

10. Now rolling them. Place number of toothpicks handy. Take one group from them then take the center small leaf with meat mixture in your hand. Pull straight the leaf easily and wrap up the meat by the leaf: if you have some remained mixture and you think you can fit some more in the leaf without opening too much gap, add more mixture to form just fitting wrap. 
11. Open up the second leaf - the center stalk side top and inside up like picture, then place the first roll - opening gap side down,  stalk side up. By doing this, the stalk doesn't come over another stalk so it will be easier to roll, and also the layers of cabbage in the rolls get even when you cut. 
12. If you have enough width going around the core, tack up the side inward at the near end, hold them together then put on the third leaf in the same way. Continue this to use up all leafs from the group.
It's a bit tricky but try to make the rolls as tightly rolled as you can. 
12. At the end of rolling the last leaf, staple the leaf end by a toothpick. Basically stub from a side of center vain over the top leaf, push it through with the leaf under and push it out from other side of stalk. Be really careful not to stub your fingers!
* Extra step if you like a rich taste: you can easily fry them on a fry pan with some butter, until each side gets lightly brawn colour. I don't do this for spring cabbage 'cause I like the sweetness of the spring cabbages as it is. 

13. Once all rolls are done, place them stand and lined in a pot: the stalk end of leaf down. You need to select a pot just to fit them all; the tighter the better because it doesn't get lose during the long cooking. 

Look how pure spring colour they can be! Just feel pleasure looking at them in my pot.
14. Pour 1/2 can of chopped tomato and 1 tsp salt and some black pepper, pour the remained water from boiling the cabbage, then pour over cold water until just the height of rolls.
15. Cover the pot with the lid and put the pot on a hob with medium high heat. Once it start to boil, open the lid and skim the scum for about 5 minutes. If you don't like fat, then continue scoop them out whatever comes out for the next 10 minutes.
16. Add all remained condiments, turn the heat down to medium; to keep the pot simmering a bit hard with the lid. 
17. Keep cooking for about 1/2 hour, check the taste of salt and adjust to your taste, then keep cooking another 1/2 hours, until the sauce reduce to 1/4 in the pot and the rolls are braised with the sauce; if the sauce reduce too quickly, then add some more water and adjust the heat.
18. Once ready, take out the bay leaf. The rolls are very soft, so be extra careful when you pull them out from the pot. 
Serve them hot with some steamed rice or mashed potato, some sauce on them. I love them on some cuscus too. 
Don't forget to remove the toothpick before you dig in!


Thursday, 27 March 2014

牛肉のたたき - Beef Tataki


Tataki is a type of Japanese cooking technique; roast only outside of fish or meat to give a nice combination of roasted aroma and fresh raw meat taste together.
You can imagine this is like a Japanese style carpaccio, mixed with the rare roast beef. But it’s more cooked than them because the meat is marinated in a sweet lemon and soy sauce.
Tataki looks as something special, but actually it's quite easy to do.
This is great match to sake as a nibbles, also this can be served as main dish with steamed rice.
I do this with just a regular roast beef meat chunk from any regular supermarket, but you can also do this with good sirloin steaks chunk; of course the taste gets even better along with the price, but not that much difference like when you use them for stakes.

Ingredients (for 2 people as main, or 4 people as starter)
500g beef for roast beef
2 bunch of spring onions (US: green onions)
1 lemon juice (it was 50 ml)
90ml water
30ml soy sauce
2Tbsp sugar
vegetable oil as you need

Methods
1. Slice all spring onions; thinner the better when you mix them with the sauce.
2. Clean meat. Take off the meat from the roasting net and discard the fat (you don't want this), then easily rinse the meat under running water.
3. If you look at the meat, you will see some lines between chunk of meats; basically the roast beef chunk which supper market usually sales comes with few tendon layer within it. Some parts just can separate by pulling off, some can't. Using a good sharp knife, cut out the chunks of meat along with those tendons.
4. Trim all tendons out from beef. If the chunks are still large, then cut along with beef meat string direction and make them into about 4cm thick/up to 6cm width chunks (Imagine, you will slice the meat diagonal to the meat strings direction at the end, and the slice will be 4x6cm rectangular shape).

* I don't discard those trims, cut them into very small bits and that's what I love to use for Sigureni recipe from Azlin this week.

5. Next prepare the sauce. Put water, soy sauce, sugar in a small sauce pan, put on a medium low heat and melt all sugar.
6. Squeeze the lemon, pour the juice into your serving dish. Once the above sauce is cooled down, then pour 2/3 of the sauce in to the same serving dish. (you want to keep the lemon still strong at this point.)
7. Start cooking the beef. Spread a little vegetable oil thinly on a non-stick fry pan, put that on high heat until the smoke start to come out. Place all meat chunks on the fry pan, fry all sides of meat until all sides get cooked easily. This will keep the nice juice of the meat inside the chunk.

8. Turn down the heat to medium then cook the 4 side of chunks that you can see the meat string line until it gets dark blown. When the meat is ready, you can feel the surface is enough hard, you can wobble the chunk to feel the center is not fully cooked, but the shape of chunk remain hard. It takes about 15 minutes.
9. Put the meat on a clean cutting board. Unlike the roast beef, you don't need to wait too long, just few minutes until it cool down to the temperature you can handle.
10. Slice them diagonal to the meat string lines, as thin as you can (about 2mm) then immediately put them into the serving dish where you prepared the lemon sauce earlier. Put all sliced spring onions then mix them well. Leave it for 10 minutes, until those sliced beef become completely cool.

Compare this picture with top one, the raw part of meat is marinated and cooked by lemon.

11. Pour in the remaining 1/3 sauce on the dish.
12. Serve it with some steamed rice.


* and this is the Sigureni I made from the trim - for me I prefer this part 'cause it gets crunchy.


Monday, 24 March 2014

雲白肉 - Yun bai rou - Chinese pork belly slices & パタン - Patan - Dipping garlic noodles

Today 2 dish in one go: Yun bai rou and Patan. Both of them are kind of junk food, awfully indulge you but I cannot label it with "healthy food" ever.
Patan is like an oriental peperoncino, served as a Tsuke men (dipping ramen).  This was a dish introduced in a Japanese drama call "Kodoku no Gurume (lonely gourmet)". The story's about a mid-age business man; one every story, he goes to different restaurant on his lunch break, alone. A very unique drama, the story is just about the food: all through the show, he comments about how the taste of his meals quietly in his mind, along with the long shot of each food and how he eats.
My family sent that to me but the drama is a killer; just indulge my appetite but I'm not in Japan, I can't go to the restaurant to try... I just had to make it up.
So this Patan recipe is totally my own creation based on my imagination from the drama, became one of the most demanded meal at my home lately.

To make the Patan, I need some pork soup, that also comes with this very nice boiled pork belly dish call Yun bai rou. Originally a typical Sichuan cousin, which imported and became popular in Japan.
Yun bai rou means "meat that white as a cloud"; it should be sliced thin as a thin cloud, but my family likes it a bit thicker than that. The sauce contains Tian Jiang you I introduced in the last post, it is really a great match to this dish.


Ingredients
for Yun bai rou (picture is a half of all I made, all gone by 3 people here):
500g a Brock of Pork belly - chose the one flat, equally spread the white fat through the layers, not too thick.
2 slice ginger (with skin but cleaned)
5cm leak (green part)
1 garlic crushed
1.8 litter water

Sauce & garnish:
1/2 cucumber (skin it, take off center seed and sliced thin)
2 Tbsp Tian Jiang You
2 Tbsp say sauce
1 Tbsp white vinegar
1 garlic grand or squeezed
some chili oil if you like it even more spicy

for Patan (for 3-4 people)
6 servings of medium egg noodles
(I use Instant one today, can be raw can be frozen, 2 serving per person for this recipe cause it's never enough for my family, you can have 1 or 2 up to you appetite)
5 garlic cloves crushed and chopped
1cm leak, white part - chopped (forgotten in the picture...)
1 Tbsp soy sauce
1 Tbsp sake
1 Tbsp sesame oil
1 Tbsp salt for soup


Method
Prepare Yun bai rou:
1.Put the pork belly block, ginger a crushed garlic and the green part of leak (cut in halves) in a large pot, with about 1.8 litter of water, bring it to boil then turn down the heat to medium and keep simmering the pot.

2. Skim the scums and keep boiling the pork for about 1 hour, until the water reduce to 1/2. Take out the pork (don't drain the soup out!) and leave them aside.
3. Mix all sauce ingredients. The grand garlic makes the sauce spicy so check the taste before adding any chili oil if you prefer.
4. Cut cucumber in slices, pile it at the center of your dish.
5. Once the pork gets enough cool to handle, slice them - as thin as you can is the proper way, my family prefer it about 2 mm thick. I also trim the skin for my hubby and leave them for my son and I - we love the crunchy skins on.
6. Line up the slices of boiled pork belly around the cucumber, serve with the sauce.

*I usually finish this first then keep it in refrigerator until Patan is ready.

Prepare Patan
1. Prepare the soup first. Strain the soup from the pork belly above to a smaller pot, add 1 Tbsp salt then keep boiling to reduce it until 2/3. Leave it aside.
2. Chop the crushed garlic and leak.
3. Boil enough water as your noodle's package states: the each package of medium egg noodles sold in UK are relatively small, we can have 2 servings per person easily. It's totally up to you how much you boil.
4. Boil a large pot of hot water, put those instant noodles and boil for - the length the package states.
5. Drain the noodles to a strainer, now splash the sake and soy sauce on the noodle in the strainer. Mix them easily using a folk or chopsticks.
6. Now the finishing part: you'll do 2 things in once: heat up the soup again while frying the noodles.
In a wok or a large frying pan which can fit all noodles, put all sesame oil, chopped garlic and leak, heat up the oil on pan for just until garlic start to smell then stop the heat.
7. Place all noodles in the pan, just mix with the garlic and oil. If your noodles are dry and difficult to handle, add extra sesame oil about 1 Tbsp.
8. Serve the soup in a small cup, each portion of noodles in a large bowl.

How to eat:
You can eat the noodles as it is, you can dip it into the soup, you can put the soup on the noodles, that's up to you. I love the combination of the noodles dipped in the hot soup and cold pork belly going together.

Sunday, 23 March 2014

甜醤油 - Tian Jiang You - Chinese sweet aromatic soy sauce

This is one of the best useful Chinese base sauce.
It has a great aroma, similar to Chinese 5 spices but even better to me.

In the next post I'll go through a Chinese cousin that is quite popular in Japan - 雲白肉 "Yun bai rou". This sauce is must thing for the recipe.
But not only that, I used this sauce for fried rice, fried chicken, BBQ ribs sauce, boiled broccoli etc usually mix with soy sauce, sake, Shal Hsing rice wine etc.
One spoon of this make any simple stir fry to add some real Chinese flavor.
The quantity makes a lot to use, usually I make this quantity and keep a bottle of the sauce in refrigerator all time; it can store up to 3 months without problem (I believe it can last longer, but it never remained that long in my home).

Ingredients
200 ml soy sauce
100 ml sake
120g sugar
* 2 thumb size orange or clementine peel - dried for few days (or use dried orange when you forgot to eat...)
* a half  thumb size piece of Chinese cinnamon stick (substitute by a regular cinnamon stick but just a long one peel should do)
* 3 pot of star anise,
* 10 - 15 Sichuan pepper corns
* 2 slice of ginger (with skin but cleaned)
3-4 cm leak (white part)

Note: basically same amount of all listed with *


By the way, that's my 200ml coffee cups. I know it is just 200ml 'cause I once checked using real majoring cup. Now I don't need the ugly majoring cup anymore 'cause I know this works.

Method
1. Put all in a pot and put on medium high heat, mix them using spoon and make sure all sugar melt in the sauce.
2. Turn down the heat to low once it start to boil.
3. Continue cooking until the sauce reduce to about 60%, the sauce should be thick as gum syrup.

4. Stop the heat, strain the sauce to a clean container, close the lid and wait until it gets totally cool down.
5. Store the container in a refrigerator; you can keep it up to 3 months without any problem.