Thursday 27 February 2014

Japanese and Oriental ingredients - Kombu & Wakame - dried seaweeds

Kombu

商品写真

Kombu is a kind of seaweed. Yes Japanese uses many different kind of seaweeds but Kombu (or also called Kobu) is the most popular part. Generally used for making Dashi (stock).
This is a thick part of large long leaf seaweeds, dried perfectly and commonly sold as few lines a pack.
It is hard when you get from a pack, need to use seasor to cut them in pieces.
Has very gentle umami (tastiness) and most basic ingredients and must have thing for making Japanese soups.
I have to say it is not cheep. But if you buy a pack, it lasts years. Small piece like a your thumb nail can be good enough to cook a large pot of tasty miso soup.

<How to store>
It needs to be kept dry, air tight and kept out from sun light; I usually cut them in small pieces like 1cm square then keep them in a bottle.
It may start to have white dust on the surface of dried leafs - that's usually not a problem.
It last really few years as long as you are keeping air tight, but will reduce the original taste. I would recommend to use them up in 2 years.

<How to use>
For stock: Cut it in to a small piece then place it in a cold water in a pot you want to make soup or stock. For general use e.g. miso soup, leave it for few minutes then start heating up the pot, take the Kombu just before the water start to boil. For long cooking meal like Nabe, leave it in soup. If you really want to have a high standard stock e.g. for osumashi (stock clear soup), leave it for 10-15 minutes then take the piece out before start heating up the water.
For other use: leave the leaf in cold water over 30min until it gets enough soft. Use it for wrapping veges, meats, fish to cook or to marinate.

Wakame

商品写真
This is the another popular kind of dried seaweed. Commonly used as a Sunomono (marinated) salad and for a miso soup. This is a very thin and fluffy part of seaweeds, easy to use. You can eat it with or without cooking.

<How to store>
Same as Kombu.

<How to use>
Place them in a small cup then pour over cold water - the dried wakame gets about 3-5 times more than when it is dried so make sure you pour in enough water to cover when it gets raw. if the things start to grow more than the water, simply add more water. Leave it for about 10 min (or the package you bought instructs). Drain on strainer, squeeze out extra water easily then serve it as a part of salad or for soup.


Nikudango-Nabe - Hot-Pot with Pork Meatballs

Nabe, commonly translated as a hot-pot, literal means just a pot. 
In general it also refers to a pot full of boiled ingredients, the soup could be seasoned, could be just a simple Kombu Dashi (stock) and eat with dipping sauce when it is served. Although there is no rule for what to be in, there are few common ingredients and well known combinations/variations. Very simple to cook (although my explanation is long), you can appreciate the best of each ingredients natural taste, one of the best food during the cold winter.
This time I made pork meatballs as the main and served with 2 different kind of sauces - Ponzu soy sauce and Goma (sesame) sauce.

Ingredients:
(Serving 4 in a large pot)

<Meatballs>
500g minced pork
2 slices ginger minced
5cm leak white part minced
1 Tbsp soy sauce
1 tsp sake
salt & black pepper
1 tsp sesame oil

<Other hot-pot ingredients>
100g Daikon (mooli)
1 Chinese leaf lettuce (based on British supermarket size, about 10cm diameter ones. Asian market usually carries more larger ones)
1 pack of Enoki mushrooms
2 leaks - choose thicker & whiter ones
1 pack of bean sprouts
100g of glass noodles (you can buy and boil 250g pack and use half of it for salad)
1 pack of Tofu
2cm square Kombu (if not available, chicken stock does good work too)
1 Tbsp of sake
1 Tbsp of soy sauce

<Ponzu soy sauce>
1/2 cup of soy sauce
1 lemon juice
1 Tbsp of Mirin (alternatively, put 2 tsp sugar and 2 Tbsp sake in a small bowl, cook it in micro-web for about 5 seconds, until the alcohol are mostly gone out. mix it to make sure the sugar is melted, leave it to cool down)
* Adjust the lemon juice proportion to fits your taste.

<Goma (Sesami) sauce>
6 Tbsp Neri-goma (Japanese sesame paste)
  or
4 Tbsp tahini + 2 Tbsp water, avoid sesame oil on the top and try to get only the sesame paste part as much as you can
2 Tbsp soy sauce
2 Tbsp sugar
2 tsp white vinegar (Japanese rice vinegar or Japanese distilled vinegar. Good quality white wine vinegar works well too)
2 Tbsp white sesame, grind in a food processor for 1/2 min
1/3 cup cold water
a pinch of salt
* Adjust the white vinegar proportion to fits your taste.

<Garnish>
few bunches of spring onions sliced
Optional: some Daikon ground and drained
Optional: 1/2 cup per person of steamed rice (for ending)

<Japanese specific tools>
Do-nabe (Japanese ceramic pot) is the best always, but be honest I also use a large but not too deep iron pot.
If you have a Do-nabe to use, make sure to dry the bottom of the pot when you cook - drops of liquid is the most easy way to crack the pot.
A slotted spoon and a large soup spoon are essential for serving.

Method:
1. Prepare your pot. Make sure your pot is large enough to share the meal. I use one of about 40cm diameter pot.
<if you use Kombu>
    Pour in water to a large pot until about half line and put the piece of Kombu in. Set it aside until the meatballs are ready.
<if you use chicken stock>
    Just place a half pot of chicken stock.

2. Prepare your meatballs. Pour cold water in another medium size pot and start to boil.
3. While you are boiling the water,  place all meatball ingredients into a bowl, mix them by your hand for few minutes.
4. The mass should be start to get stickier by the melting meat fat naturally. If the minced pork has too less fat and cannot make them together, add small amount of potato starch or all purpose flour (up to about 1 Tbsp). Nice to leave this mixture in your refrigerator for over 1 hour, usually not possible for me with my 2 hungry boys behind me.
5. As soon as the water in the medium size pot gets boiled up, reduce the heat to medium low and start making about 2-3 cm diameter balls. Just scoop it by a tablespoon and make a ball between your hands. Put it into the boiling water from the one you made.
6. Once all meatballs are in the pot, then bring the heat up and boil them for 5 minutes, skim out visible scums through the time.
7. Using a slotted spoon, take all meatballs out to a plate (don't drain out the soup) and stop the hob - don't worry that they are not fully cooked here because you will boil them again in a pot.
8. Place a sheet of kitchen paper on a strainer, then place that on the main large pot. Strain the meatball broth carefully into the main large pot until about 80 % full.
9. Put the meatballs, sake and soy sauce in the main large pot.
10. Cut Daikon in about 2 cm thick, skin it then cut them in 4 quarters. Place them in the main large pot, place the cap and cook them for about 10 minutes until it gets soft. Stop the hob and leave the pot aside.
11. Prepare all other ingredients. Cut Tofu in half width then slice it in about 3 cm pieces.
12. Cut the Chinese leaf lettuce in about 3-4 cm size, the large leaf parts as below, smaller ones are into half.
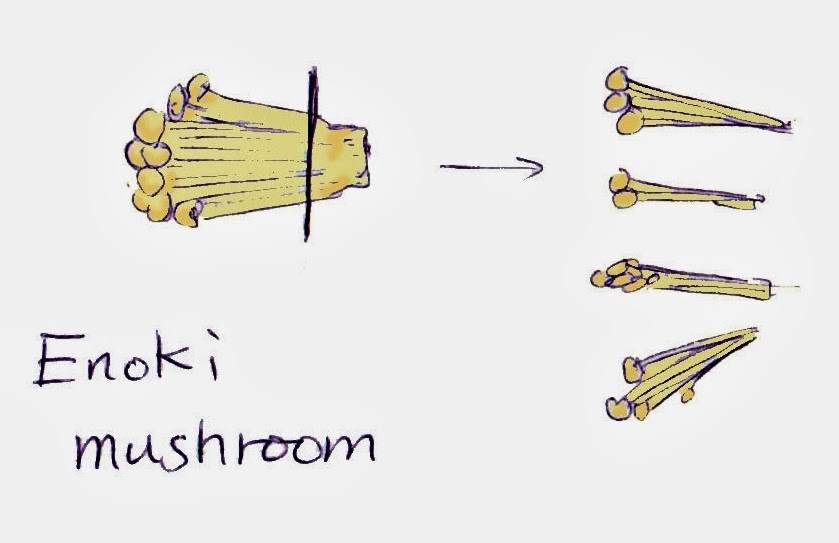
13. Cut the Enoki mushroom, enough above the tighten bottom of a pack, like the picture below, then wash well under running water with separating them into small bunches - especially carefully check and clean the bottom part, they may contain some small piece of soil still in.
14. Trim out the bottom and top green part of the leaks and cut it into about 2 cm slices as below picture.
15. Place the bean sprouts in a strainer, wash them under running water then trim the thin roots and the remained seed shells - be honest, this is boring optional work. When I really don't have patient time I omit this work. Painful task but it makes difference when you eat.
16. Boil the glass noodles with the tied strings in another sauce pan. When the noodles start to get soft, scoop the tied string with a fork (or chopstick if you can use) and take it out from the pan. (The string is difficult to take off when the noodles are dry but much easier after boiling them in a pot.) Waggle them by the fork and make them loose, keep boiling for few minutes until all part of noodles are transparent and soft.
Drain them on a strainer, run over cold water until it gets cool, then place them on a cutting board and cut it in to 4 quarters.


17. Prepare the serving sauce and garnish. Mix all listed ingredients for each sauce in each serving sauce bowl. Slice the spring onion, optionally grind the small piece of skinned Daikon, drained the liquid then put them on each small serving plate.
18. Place all kind of ingredients you prepared into the pot, except the Daikon & meatballs you already cooked in, following the next order: the white part of Chinese leaf lettuce, leaks, Enoki mushrooms, Tofu, glass noodles, and at last, the green leaf part of Chinese leaf lettuce on the top of all (basically the thing that harder and takes longer to cook goes to the bottom and soft/easy to cook things are at the top).
* Don't need to cook all in once, adjust the amounts to put into the pot as your family can eat in once (especially if you don't have a table hob), keep at least few cm without soup at the top of the pot, for not to blow it up.
If you have too much soup then place some out in another bowl or pot. you can add them for the 2nd round.
19. Place the cap on the pot.

Now the real cooking part.
The whole point of hot-pot is to be served from the hot pot to your dish to your mouth while they are on heat. If you have a table hob, this is the time to use it. If you don't, don't worry, you just need to cook them in smaller amount and boil it several times as it goes.

20. Firstly, start cooking it on your regular hob.
If you are using Do-nabe, use medium high heat, keep eye on it and wait until the top of the cap center gets heated. Depends on the size of pot but mine takes about 15 minutes.
Once it is boiled, then move the pot carefully on to the table hob and keep heating the pot with a low heat.
If you are using a regular large pot, then just boil them using high heat until start to steam out, check the white bit of Chinese leaf lettuce are softened then bring it to table.

How to serve/eat:
Take off the cap. The pot should looks like the top picture.
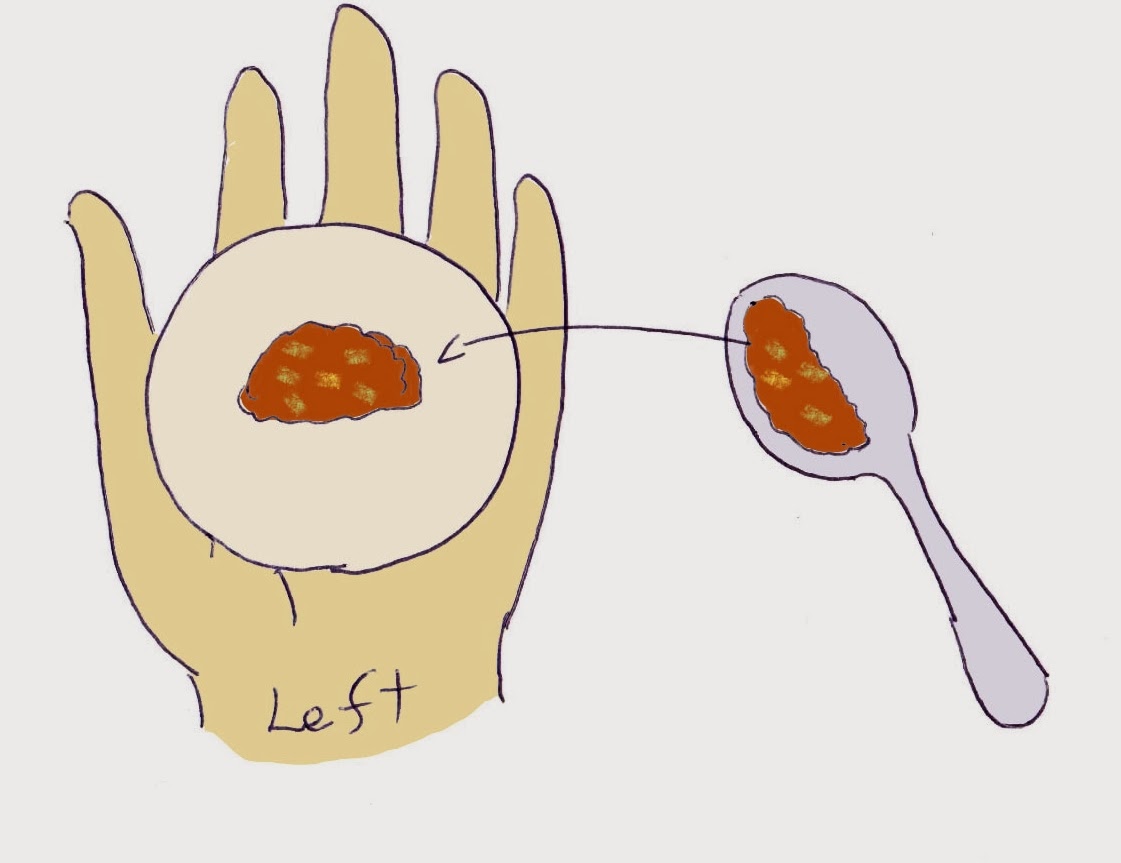
Each individuals are served with a small bowls to take your portion. Serve few each but every kind of ingredients from the pot to each bowl, then each person can pour the preferred type of sauce on it. Optionally add some ground Daikon and/or sliced spring onions. Adjust the sauce strength by adding some soup. If you like soupy way then add up more soup from the pot.
Alternatively, let everyone serve their own bowl by themselves.

In my home, I serve only the first round to everyone, then from the next round, everyone serve their own bowl with what ever they like.
Keep repeating the pot until everyone satisfy the meal. Adjust the soup level by adding some water if it gets too low.

Optional: Ending
Once everyone satisfy with the meal, then the pot should be kind of empty with the soup only remained. To end the meal, we usually put some rice in the remaining soup and enjoy the Ojiya (rice soup). Put the required amount of steamed rice (can be just cooked or cold left over) for about 5 minutes, until rice get soft and soup start to be slightly sloppy, then season it by a bit of salt, miso or soy sauce.
Alternatively, cooking Udon noodle in the soup is very nice way too. again salt, miso or soy sauce to season it. Also if you have too much ingredients still remain in the soup, that makes excellent miso soup for the next day; just heat it up again the pot, then stop the heat once boiled up and mix in some miso to fit your taste.
All this is possible because the nabe has already made the good stock out from all ingredients.

By the way, the Kombu, if you use, should be left in the pot until the end of meal. Not many people like it but I love to nibble it at the end...


Sunday 23 February 2014

How I flip a crape using a long chopstick


(By the way I made the *ficelle picarde* from cuisinons bien by those crapes.)

Chijimi - Korean Thin Pan Cake

Korean Chijimi became popular in Japan along with all other new Korean cultures. In Japan we have a quite similar dish call, Okonomi-yaki, but with or without cabbage makes a big difference in terms of taste, and the how it baked is very different. The thin made pan cakes contain a lot of veges in it, its springy inside and slightly crunchy outside. The served sauce is completely different as well, the sesame seeds and minced leak flavour in the sauce makes the perfect exotic savoury taste.
It's quick to prepare and good for busy lunch.
This recipe is based on few Japanese/Korean recipes.


Ingredients
150g flour
2 eggs
120 ml water
1 potato grated

a handful julienned carrot
a handful julienned leak
2-3 bunch spring onions sliced

(optional) few seafood sticks threaded

sauce
4 Tbsp soy sauce
2 Tbsp rice vinegar
1.5 Tbsp sesame oil
1 Tbsp leak white part minced
1 Tbsp sesame seeds

Methods
1. Prepare veges. Julienne carrot and leak as below. Slice 2-3 bunches of spring onions. Set aside.

2. Make sauce. Just mix them all in a bowl and leave it aside.

3. Make pan cake mixture.  Crack eggs in a cooking bowl and add flour in few times, roughly mix them all. Add the measured water in few times and now mix them better. Add the grated potato and mix them well. Now the mixture should be smooth enough.

4. Prepare the fry pan on high heat. When the pan get enough heated, add 1/2 Tbsp oil then spread over the surface using a kitchen paper. Just be careful the pan is hot! Now add all veges in the pan cake mixture, then mix them few times until all veges are completely covered by the mixture.
5. Turn down the hob to medium heat then add the mixture on the pan, spread evenly using a fork and make it thin round shape (about 5 mm height). If you like sea food, you can sparkle few threaded seafood sticks on the top. In my fry pan I could make 2 sheets by above quantity. Just make it in your fry pan size.
6. Once the bottom of the pan cake start to get a bit brown then turn the Chijimi. Leave it until the other side also get light brown colour.
7. Serve on a large plate, cut it in slices, dip the sauce and dump it in to your mouth.
Job done :-)

Thursday 20 February 2014

Gyoza - Japanese adapted style pork dumpling


Gyoza is a type of dumplings that is made based on Chinese dumplings: I heard that Chinese people prefer to have them boiled in soup, in Japan we definitely prefer this fried.
The original recipe has been adapted and twisted so the Japanese style recipes became so different at the end. When a Taiwanese friend looked at my recipe, he couldn't believe that I'm adding Miso in it.
The good Gyoza should be smooth and soft at the top skin by steam but crunchy at the bottom with a bit of browned skin. Dip it in the sauce and when you get a bite, the tasty meat with the juice comes out to your mouth .... mmm yummy.
Unfortunately this recipe requires some Asian specific ingredients. I described as many things as I could in related pages, hope it helps.

Ingredients  (aprox. 40 Gyoza for serving 4 people)
    2 packs of ready made dumpling pastry
    (each pack usually contains 20-25 sheets, something like this)
b) 500 g minced pork
    50 g white cabbage
b) 1 Tbsp ginger minced
b) 2-5 garlic cloves minced (I love a lot of garlic in but this is totally how much you can take)
b) 10 cm leak white part minced
b) 1 Tbsp soy sauce
b) 1 Tbsp sake
b) 2 tsp sesame oil
b)  salt & black pepper
a) 1 Tbsp white miso
a) 1/2 tsp chicken soup powder (optional) + water from boiling cabbage
    or
a) 1 cup chicken stock (optional)

Serving sauce
Soy sauce & sushi-zu (1 : 1)
few drops of chili oil (La-yu)

<Method>
0. If you buy a frozen dumpling pastry, you will need to leave it out at room temperature for half a day. If you are in hurry, you can put it in microwave to defroze them, but most likely you will lose 1 or 2 top and bottom sheets, it gets too hard on top and too soggy at the bottom.
1. Prepare the cabbage. Boil the cabbage in hot water. If you don't have chicken stock then keep a cup of water from the boiling cabbage. Drain the excess water out from boiled cabbage, mince them in about 5mm square. leave it aside.
2. Mix all listed with a) in a small cup. If you are using the cup of boiled water then mix the chicken soup powder first. If you are using chicken stock, warm up before mixing the miso in.
3. Put all listed with b) in a large bowl, then take minced cabbage in your hand, squeeze them well to drain out water, then put it in the bowl.
4. Mix them well using your hand; little by little adding the mixture of a) along with mixing them. The mixture start to get shinier and stickier, you can feel the fat start to melt. This is the key: you don't add all water, you add them until just the limit that you feel the mixture start to get little wet and cannot absorb any more liquid . If you added too much liquid, don't worry, just drain excess out.
5. Wrap the bowl with a plastic wrapping sheet then leave the mixture for at least 1 hour in the refrigerator.
6. Prepare to make dumplings. prepare a small dish of water, a tablespoon (or 2 tablespoons and a pair of another helping hands would do even better), dumpling pastry out from pack, 1 or 2 large plate half covered by plastic wrap in order to avoid  your dumpling gets dried out and hard.
7. Make dumplings. You may think it's tricky, I say not necessary. Depends on how sophisticated way you make. Key here is, do not put too much mixture inside. The more mixture you put in the more difficult it is to close them up.
Keep in mind; the ultimate goals of doing this are 1) to make the Gyoza stand up so the bottom can sit on the frying pan when you cook, 2) to enclose the mixture in the Gyoza so the precious juice will remain until you put it into your mouth.

Place one sheet of dumpling pastry on your left palm (do it opposite if you are lefty). Scoop out just 1/2 Tbsp of mixture and place it on the center of the pastry, like picture.

Wet the all outside border of the skin using your right hand finger, like picture.


I'll describe in 3 ways from here:
a. Now if you have no confidence at all, don't worry, just fold the pastry in half and close all side together well, then make it stand then PUSH down the center so dumpling can stand. This is what I do for my son.


b. If you want to try a bit better looking, then fold the pastry lightly in half, hold the top center together by right hand fingers, hold it, push up the side using the left hand finger and make a excess flap in front. Fold the flap downward and close the side well. Do the same to other side. This is simple to do, but also has a benefit, it contains more mixture inside than the regular shape.

c. At last, if you are already good at doing detail work, then make small overlap from one side to the other side. Basically you will keep the pastry on your left palm through time, fold them gently in half, sustaining the shape by left hand middle finger to pinkie finger and bottom of right hand thumb. Then, from left side end, fold backside and front side sheet together using the left hand pointing finger and thumb. While holding them together, gather up the next flap using the right hand thumb, overlap the flap on where left thumb is holding then hold them again using the left thumb. repeat this to make wave of flaps till the right side end.


8. Now frying the Gyoza. Place the frying pan on a hob with high heat, leave it until it gets enough hot. Turn down the heat to low, add about 1 Tbsp oil in, spread it through the pan then start placing Gyoza in few rows. heat up to high again, wait for 1=2 minutes, pick one at the side and check until the bottom start to get lightly browned.  Now add water from outskirt of fry pan to cover about 1/3 of the Gyoza bottoms, then cap the frying pan to steam the Gyoza. Once the most of the water evaporated, take off the cap and take a look inside: if the skin is mostly transparent and can see through the pink colour of pork meat inside then it should be cooked enough; if not then add a bit more water and cap it for a while more.
9. Now leave the pan without the cap and continue frying for another minute, until the water is completely dry and start to form a fluffy burned skins around the Gyoza. Stop the fire, serve them on a dish. The sause is simply mixing the sushi vinegar and soy sauce, add some chili oil to spice up.

By the way, the bottom piece in the picture is a bit advanced from style b as below picture. I had the pastry only remained at the end, so wrapped some sliced baby onions, a bit of shredded chicken breast and mozzarella cheese.


Wednesday 19 February 2014

Simple whole chicken soup

This is my favourit winter meal, seasoning is only salt, black pepper and sesame oil but chicken does the full good job, simple but so tasty.
This is from Japanese recipe, but I believe that was also adapted from Korean recipe. 
Takes about 2.5 hours but your real work is less than 30 minutes. 

<Ingredients>
1 medium size whole chicken
1 Chinese leaf lettuce
2-3 ginger slice
2-3 Garlic cloves
5cm Leak green part
1 Tbsp sesame oil
generous amount of salt & black pepper
a lot of boiling water

few bunch of spring onion sliced for garnish
some soy sauce for serving

<Tools>
1 big pot that whole chicken can fit and has enough height
1 large and strong strainer
electric kettle helps well

<Methods>
1. Easily rinse the chicken under running water then place it in a large pot.
2. Put 2 slice of ginger - rinse the skin but not trimmed.
3. Cut about 5 cm of leak green part, peel some outside leaf if needed then rinse that under running water - green part may have some soil between leafs. Put it in the pot.
4. Pour boiling hot water in the pot from your kettle, until covering most part of the chicken in the pot. (A bit of top out is OK, just turn around the chicken in the pot during the next step)
5. Boil the chicken with high heat for about 15 min - don't worry about the scums.
6. Place strainer in your sink, drain out the pot including the chicken in to the strainer.
7. Lice the pot easily under running water, then put back the chicken into the same pot.
8. Season the chicken with salt and black pepper all over, splash 1 Tbsp sesame oil and rub the salt and black pepper into the chicken.
9. Pick the garlic from strainer, slice them and also put it in the pot. Discard the remaining ginger and leak.
10. Pour hot water in the pot again until the same level.
11. Cap it and start boiling the pot on high heat, turn it down to medium low when the soup start to get bubbling. leave it on the heat for about 2 hours. Turn over the chicken once during that 2 hours.
12. Cut the Chinese leaf lettuce: you can cut in any way but this is suggested way to keep the leafs not to disappear when you eat. Cut the green leaf part out first, cut the leaf part in 4 quarters, then slice the white part along with the growing direction in about 1 cm width; this will keep the leafs longer without melt in the pot. Keep them separated between leaf part and white part.
13. When the chicken is cooked for 2 hours, check the soup taste and adjust with some salt and black pepper if you need.
14. Now in that pot, put white part of leafs first, squeeze in between the chicken and the pot, then place the remaining green leaf part on the top of them. Cook for another 15 minutes.
15. Serve them in a large soup bowl; cut the meat out in small pieces, pour some leafs and soup too, sparkle some spring onion slices for garnish. Eat with a bit of soy sauce if you like. Served with some steamed rice, or just put them in the soup like I did in the picture.
Enjoy :-)

Tuesday 18 February 2014

Home made Queso Blanco & Corn Cake


Well, this started by my husband was aside me when I was browsing the foodies+.
He saw the Brazilian Chef's corn cake post, since that moment, he kept nagged me to make that cake.
I knew I had all ingredients at home so as I promised with him, I made it on weekend.
The recipe was deadly simple and fun. Just keep adding the ingredients using the same corn tin. Detail recipe is here: https://plus.google.com/116979010991000249483/posts/FZ4uCKBzPDk


Then, when the cake was ready, he started again. This must be with Queso Blanco, the South American style white cheese.
I somehow knew that he is going to say that. In Venezuela, I also tried the typical corn cake call Cachapa and it was usually served with butter and cheese. but we both knew that the cheese is not common in UK.

I was just trying to see if in any chance I can find a store selling the cheese, then.
There were few recipes instead. All existing links described the very simple recipe, I needed was just a bit of courage because the amount of milk I will use (and could be wasted).

My ingredients here:
1 pint whole milk
2 lime juice
salt

That's all.

Method:
Boil the milk slowly up to 85 degree in a large pot, then take the pot out from heat and add the lime juice.
*The salt should be added just after lime juice I believe. From today's experience, this should require about 1 Tbsp.
Drain the mixture on a cheese cloth over strainer.
*another mistake I made, in Venezuelan style, the mixture is to be just drained naturally rather than pressed.

Then Done! That 2 pint of milk could make about 200g Philadelphia cream cheese pack size.


According to my husband's opinion, apparently I draining the liquid too much for his like it, the cheese became much like ricotta cheese. But anyway this was my first home made cheese.


Update: My current best balance/method is in below. Once I totally satisfy, then I'll replace this post.

Ingredients:
1 pint whole milk
2 lime juice
1 Tbsp salt

Method:
1. Boil the milk slowly up to 85 degree in a large pot, then take the pot out from heat and add the lime juice and salt.
2. Immediately you will see the liquid and cheese bits get separated. Leave it for few minutes.
3. Drain the mixture on a cheese cloth over a strainer.
4. In Venezuelan style, the mixture need to be left on a strainer without press, so the liquid to be drained naturally; it is nicer to drain on anything that can drain and in the shape you like to make.
5. I used a Philadelphia cream cheese cup, I made several holes at the bottom by a knife. If you like to make it harder (and quicker), you can just press the mixture between 2 containers like I did.
6. Wait until the cheese gets cool down.


Sunday 16 February 2014

Tonight dinner was Tonkatsu & Arancini from Foodies+

I do make tonkatsu at least once a month, now Michael F had post Tonkatsu sauce on Foodies+ sounding great. I thought I have to try this.

His post link is here for my reminder: http://doyouevencookbro.blogspot.co.uk/2013/12/tonkatsu.html#more
I have to be honest, the sauce was different from what we usually use for Tonkatsu, much sweeter in the taste, but it was really matching to Tonkatsu taste.
This is definitely going to be in my recipe archive.


Then Lisa has posted a very nice Arancini, excellent way to reuse remained rice and what I usually waste from Tonkatsu cooking (breadcrumbs and beaten eggs). Thanks to her, I had nothing remained after cooking :-)
Her post link is here for my reminder:
http://www.italiankiwi.com/arancini/
We were staffed with all those nice foods in once.

Wednesday 12 February 2014

Warabi-mochi (potato starch jelly)

Sounds wrong I know but this is a very typical Japanese sweet.
Originally made by the warabi (blacken) starch, but that was long ago, before potato start to grow in Japan. Now a days this is usually made by potato starch.
For early Valentine's day, I made this for my boys in heart shape with my love and care.

Then they came back to me saying it's too sticky and difficult to cut.
Hmmm. After all, I had to cut the hearts into small pieces.

This tells something, doesn't this?
What they don't know is, I reserved some out from each dish; my love has been deducted.
Recipe is deadly simple finishes in 10 minutes - this also tells something....
* Eat them immediately as it gets dry and hard if you leave it long.

<Ingredients>
50g sugar
100g potato starch
150ml cold water
some kinako: soy beans powder
some matcha green tea powder
additional sugar if you prefer sweeter

<Tools>
a microwave safe bowl - like a soup bowl
a flat plastic container which can fit all above in one - something like a takeaway container (not a paper doggy bag in USA style)

<Method>
1. Mix all ingredients in a microwave safe bowl. It melts quick and easy.
2. Put the bowl in a microwave for 30 seconds, then carefully take the bowl out, mix the contents.
3. Put the bow again in the microwave for 30 seconds, then carefully take the bowl out, mix the contents. - it should be getting slightly hard around the bowl, scratch them and mix them all.
4. Put the bow again in the microwave for 30 seconds, then carefully take the bowl out - (I'm not trying to make the recipe longer), just repeating again but now the mixture must getting stickier and harder to mix. still mix them well.
5. Put the bow again in the microwave for 30 seconds, then carefully take the bowl out - now the mixture should be really sticky, no liquid remained, and slightly transparent. mix them again, take the mixture out to your plastic container, spread the mixture in the container to be flat. Be careful, the mixture must be very hot and will stick to your hands; Use 2 wet spoons, one to hold one to push.
6. Once the mixture is flat in the container - doesn't need totally flat or fitting until corner - then bring the container to under running cold water. Don't worry, it won't melt. Cooling down by the cold water, the mixture start to get clear. once it's enough cold to handle it, take it out on cutting board and cut them in about 2cm square or what ever the shape you prefer (but not too big shape like my heart because difficult to eat).
7. Serve it with some kinako (soy beans powder) or green tea powder on with some sugar if you like them more sweet.
* Be aware this sweet is sticky.
* Eat them immediately as it gets hard if you leave it long.

Sunday 9 February 2014

Fiery Harissa at Home form +Michael F.

I've tried already 3 years growing home chilies and thanks to the good hot summer last year, finally it paid me off with full of small nice red chilies on the tree.
Then, I didn't know what to do. Since I've never used so many chilies in my life.
I had some ideas, I wanted to spend them all in once, for sauce, sure, but How?
Then comes the Michael F's  Fiery Harissa at Home on foodies+. The only problem was looking too spicy and didn't know where to use. Then he kindly posted this Chicken Tajine w/ Harissa, Apricots, and Walnuts just after that.
Now with some more advice from him, I made my first Harissa today.
I just had to take the pictures of my sweet and precious chilies' transformation.
Just picked from the tree:
 Then trimmed the head and all seeds out.
Rehydrated as Michael kindly gave me the advice - then amazing! The dried chilly came back fresh! well,,, not as really fresh as when it was used to be, but much more than I expected.
Since my chilies are once dried out, I had to guess how much weight it could have been. I looked at the regular pack of chilies from supermarket and roughly calculated it as about 100g.
I don't know about chilies much but I know Habanero is one of the top heat.
I'm real novice here, so "No" Habanero in my sauce.
And Voilà! this is mine. My very first chili sauce, Harissa here.
It's a bit rougher than his picture, 'cause it was too less quantity for processing till smoother state.
Now he commented I should try - no I can't. Looking too scary.
I dipped a bit of bread (mostly to olive oil) and then, it's sooo tasty! but soooo hot!
On its own is too hot for me to try, now I really need something to eat with.
So I decide to cook something simple to spread the taste - but not to kill the spice.
And made this.
Too easy to become a proper recipe.... very simple.

<Ingredients>
3 baby onions chopped.
a bag of Tenderstem Broccoli Spears (the bag says 220g) washed and chopped in half.
1 Tbsp olive oil
2 Tbsp white wine
1 tsp soy sauce
1/2 cup water
1/2 tsp Harissa

<Method>
With a Tbsp olive oil on frying pan, stir-fry the stem and chopped baby onions over high heat for few minutes.
Add the white wine and 1/2 cup of water, cap the pan and steam them for another few minutes.
Open the cap, try and check the thick stems are cooked, then add about 1 tsp soy sauce and finally about 1/2 tsp precious *Harissa*.
Just stir-fry and tossing them on the pan for few times and done.

When it's cooked with food, chili became not too spicy but the condiments aroma spread through the veges and done a very good job. Wonderful sauce, I'm loving it.

Japanese type Sandwich bread - Pain de mie (Quick & easy version)


The sandwich bread in Japan tastes totally different from what I've got in USA market or here in UK market. They are usually more moisture, with rich milkier test, more concentrated but smoother texture, soft but springyApparently it is based on a type of bread from French call Pain de mie. There is a full version recipe to replicate the best of Japanese sandwich bread at this post

Since I start to make this kind of bread, my son doesn't accept any bread from supermarket. So I needed a simpler and quicker version.
This is the quick and easy version that the bread maker does the all hard working part.

I've revised this post with my java script application for calculating the portion of each ingredients for making this bread in different size.
Just place the "Strong flour" weight or" Total" weight you want it in grams, then click on "Calc" button. 
It will calculate the rest of ingredients weight. 
I was trying to make more generic app that I can manipulate with any ingredients, then Blogger page apparently restricts some Java script and couldn't make it.

Ingredients(g)Bakers %Custom(g)
Strong flour260(100%)
Sugar16(6%)0
Salt4(2%)0
Dried yeast5(2%)0
Skimmed milk5(2%)0
Butter22(8%)0
Honey11(4%)0
Milk195(75%)0
Total:518

Methods:
1. Cut the butter into 1-2 cm cubes (for adding them later).
2. Put the kneading blade into the bread pan. (It has only one direction to slot in and not easy to get lose)
3. Scale and put all ingredients except butter in the bread pan.
5. Plug in the Bread Maker, place the bread pan in the BM, then select the "Basic Rapid" menu (Menu 02 for Panasonic SD-2501) and press "Start" button. 
6. Wait for 5 minutes and when the kneading phase start, put the butter in the bread pan (just open the lid, put them into the working bread pan, then close the lid back). 
7. Press the "Stop" button when the beep sounds. Take the bread pan out from the BM, take the bread out from the bread pan then put it on a wire rack and leave it to cool down. Better not cutting them until it gets enough cool, takes up to 1 hour (depends on the loaf size and the room temperature).
8. Keep it in a plastic bag. 

Thursday 6 February 2014

Kamaboko decoration

Kamaboko - is a kind of cooked Surimi (steamed white fish meat). Usually comes in red or white colour outside.
Commonly used for special occasion as Japanese uses red and white colour combination for the celebration.
I bought a bar of Kamaboko for Osechi, the Japanese traditional January 1st meal, then many things happened and I had to cancel my Osechi this year and couldn't use this.
Now before it gets too old, I used them for my cutting practice.
Well, just a simple and easy ones which my Hou-chou skill can do.


Nice to use them as a decoration, sashimi, in a soup or for stew.
I guess you can guess how to do if you look at them closely but below is some description I draw how to cut them. If that's not clear, search You Tube with key word Kamaboko.

Firstly take out Kamaboko from the package, then cuts off slices as much as you use. 
Variations: Sunrise (top in the picture)
 Variations: Knot (left bottom in the picture)
 Variations: Rabbit  (right bottom in the picture)
 Variations: Pine leaf  (centre bottom in the picture)


Sunday 2 February 2014

Japanese style - Pork meatball's Hot-Pot

Today we had a "Nabe" - Japanese hot-pot. This is a most popular meal in winter time, it can make with any meat as the main, however there are popular combinations.
This one was with "Niku dango" - pork meatballs and regular hot-pot veges - Chinese lettuce, enoki-mushrooms, green bean noodles, leaks, Daikon -mooli, beansprouts. Served with sesame source and ponzu source.
Preparation & cooking of this is really quick but nice and warm meal for cold day like today.

Just the pictures to upload today, recipe comes later.